Ottimate’s Expense Reports feature allows employees to submit multiple reimbursable expenses together in one report. You can add general expenses, mileage expenses, receipts, and accounting details before sending the report for approval.
To make expense creation faster, Ottimate can also process receipts in bulk and automatically create expense rows using receipt details. This helps reduce manual entry while still allowing employees to review and edit each expense before submitting.
Depending on your company’s reimbursement configuration, approved expense reports can either be reimbursed directly through Expense Management as an ACH payment to the employee’s bank account or converted into an invoice in Ottimate for processing through your AP workflow.
When to use an expense report
Use an expense report when you need to submit multiple reimbursable expenses at once, such as:
Weekly or monthly employee reimbursements
Travel expenses
Mileage reimbursements
Meals, supplies, or other business expenses
Expenses that need receipts attached for review
Create a new expense report
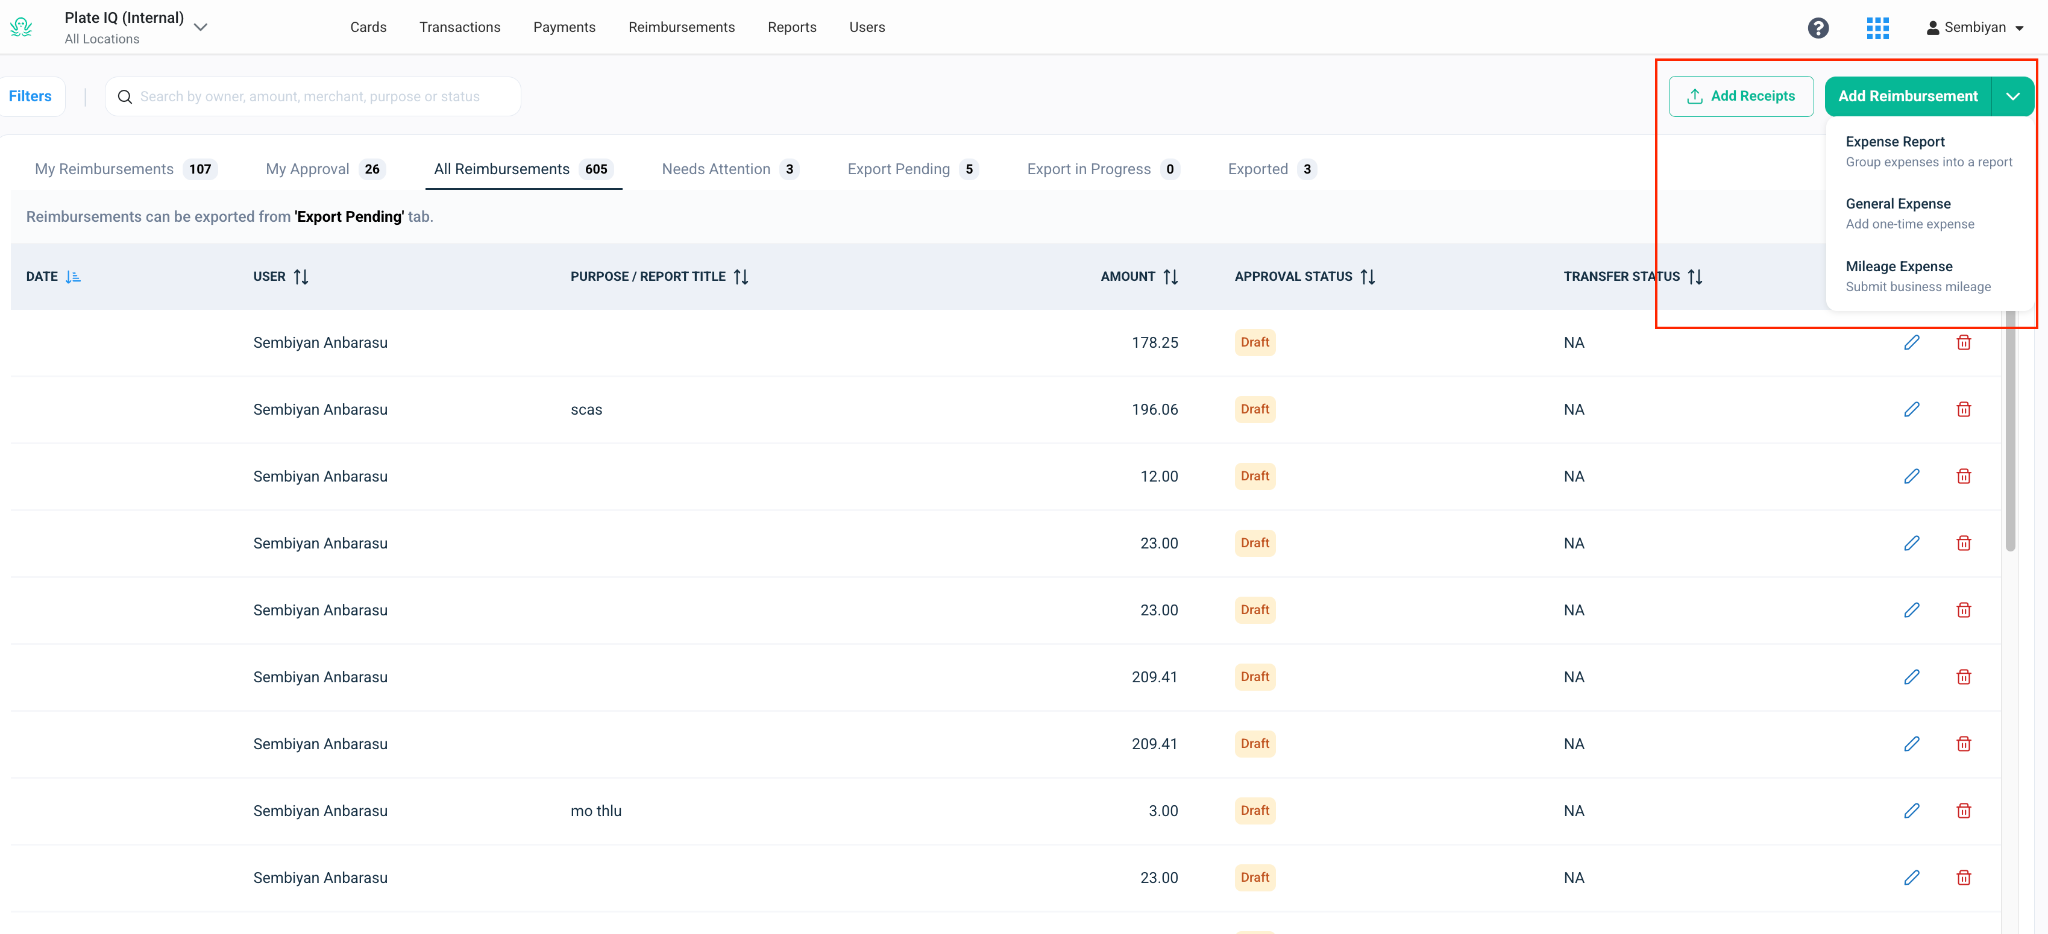
Go to Reimbursements.
Click Add or Create Expense Report.
Enter the expense report header details.
In the report header, complete the required fields:
Report Title: Enter a clear name for the expense report, such as “Weekly Expense Report” or “Client Visit Expenses.”
Reimbursement Location: Select the location under which the report is being submitted.
Expense Report Date: Choose the date for the expense report.
Payee / Vendor Code: Select the employee vendor record from your accounting system.
Memo: Add any additional details, if needed.
The payee or vendor code connects the reimbursement to the correct employee vendor record. Depending on your company’s setup, this may be used for invoice creation or reimbursement processing after approval.
Add expenses to the report
After completing the report header, you can add expense rows to the report.
Ottimate supports three ways to add expenses:
Bulk Process Receipts: Upload receipts and let Ottimate create expense rows automatically.
General Expense: Manually add a standard reimbursable expense.
Mileage Expense: Add a mileage-based reimbursement.
You can add multiple expense rows to the same report.
Add expenses using Bulk Process Receipts
Use Bulk Process Receipts when you have one or more receipts and want Ottimate to create expense rows for you.
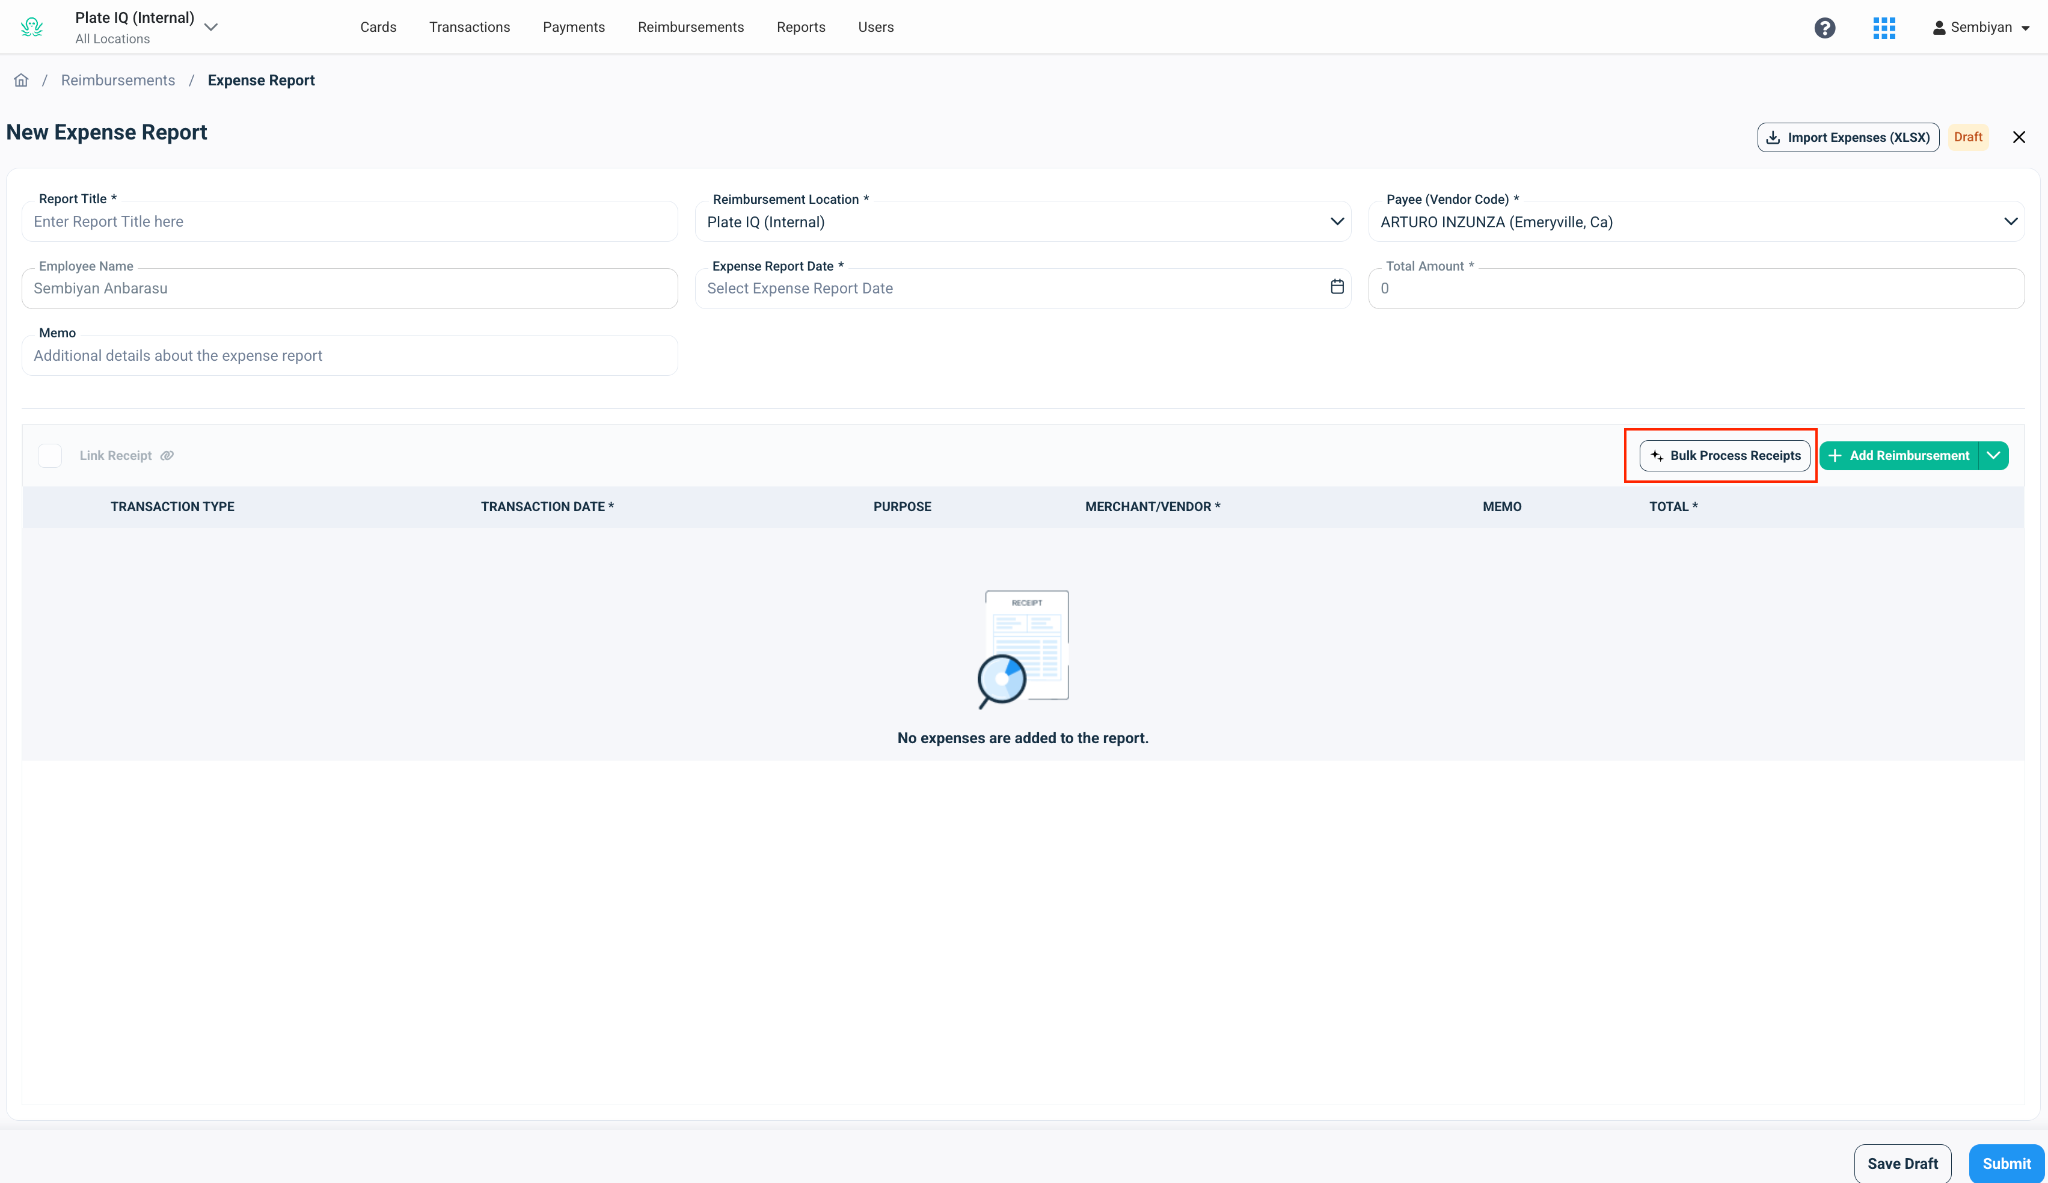
To bulk process receipts:
Click Bulk Process Receipts.
Upload the receipts you want to include in the expense report.
Ottimate reviews the receipts and creates draft expense rows based on the receipt details.
Review each created expense row.
Confirm or update the details, such as:
Transaction date
Merchant or vendor
Purpose
Amount
Memo
Accounting details
Make any corrections if needed.
Submit the expense report when all rows are complete.
Ottimate uses receipt details to help fill in expense information automatically. You should still review the generated rows before submitting to make sure the information is accurate and complete.
Add a general expense manually
Use a general expense for standard reimbursable expenses, such as meals, office supplies, lodging, parking, or other business purchases.
To add a general expense manually:
Click Add Reimbursement.
Select General Expense.
Enter the merchant name.
Select the expense date.
Enter the purpose of the expense.
Enter the expense amount.
Add the required accounting details, such as location, GL account, or department.
Attach the supporting receipt.
Click Add to Expense Report.
The expense will be added as a row in the report.
Attach a receipt
Receipts can be attached while adding a general expense.
You can either:
Upload a new receipt from your device, or
Select a receipt that was already uploaded to the same expense report
This is useful when multiple expense rows are supported by the same receipt. You do not need to upload the same receipt more than once.
Add a mileage expense
Use a mileage expense when you need to be reimbursed for business travel based on distance.
To add a mileage expense:
Click Add Reimbursement.
Select Mileage Expense.
Choose a saved address or enter a new starting address.
Choose a saved address or enter a new destination address.
Ottimate calculates the distance automatically.
Enter the purpose of the trip.
Add the required accounting details.
Review the mileage details and route map.
Click Add to Expense Report.
The mileage expense will be added as a row in the report.
Review and submit the expense report
Before submitting the report, review all expense rows and confirm that the details are correct.
This is especially important for expenses created through Bulk Process Receipts. Ottimate helps fill in the expense information, but employees should confirm the details before submission.
Make sure each expense includes:
Correct expense type
Expense date
Merchant name, if applicable
Purpose
Amount
Receipt, if required
Mileage details, if applicable
Accounting details
Once the report is ready, click Submit.
You can add as many general and mileage expenses as needed before submitting the report.
Save an expense report as a draft
If you are not ready to submit the expense report, you can save it as a draft.
Use Save Draft when you need to:
Add more expenses later
Review receipt details before submitting
Complete missing accounting information
Wait until the end of the reporting period before submission
Draft reports are not sent for approval until they are submitted.
Import expenses from XLSX
If your company uses spreadsheet-based expense entry, you may also see an Import Expenses (XLSX) option.
Use this option to upload expense rows from a spreadsheet instead of entering each row manually. After importing, review the expenses before submitting the report.
What happens after submission
After an expense report is submitted, it is routed based on your company’s approval policies.
Approvers can review the submitted report, including:
Expense report details
Individual expense rows
Receipts
Mileage maps
Accounting details
Depending on the approval workflow, approvers can approve the full expense report or reject specific expense rows.
Approving an expense report
As an approver, open the submitted expense report from your approval queue.
Review the report details and each expense row. You can open individual rows to view supporting receipts or mileage details.
Approvers can:
Approve the expense report
Reject specific expense rows
Review receipt attachments
Review mileage routes and calculated distance
Confirm coding details before approval
Once the report is approved, it moves to the next step based on your company’s reimbursement configuration.
After approval
After approval, the expense report follows your company’s configured reimbursement workflow.
Depending on your setup, the approved expense report may:
Be reimbursed directly to the employee
Be converted into an invoice in Ottimate
Be exported to your accounting or AP system
Be paid through Ottimate VendorPay
Tips for avoiding approval delays
Before submitting an expense report, make sure:
The report title is clear
Each expense has the correct date and amount
Required receipts are attached
Receipt-processed expenses have been reviewed
Mileage entries have accurate start and destination addresses
Accounting fields are completed correctly
The correct payee or vendor code is selected
Providing complete information helps approvers review the report faster and reduces back-and-forth corrections.
Frequently asked questions
Can Ottimate create expense rows from receipts?
Yes. Use Bulk Process Receipts to upload receipts and let Ottimate create draft expense rows automatically. Review the rows before submitting the report.
Do I still need to review expenses created from receipts?
Yes. Ottimate helps fill in the expense details, but you should confirm the merchant, date, amount, purpose, receipt, and accounting fields before submitting.
Can I submit multiple expenses in one report?
Yes. You can add multiple general and mileage expenses to a single expense report.
Can I add both general expenses and mileage expenses to the same report?
Yes. A single expense report can include both general expenses and mileage expenses.
Do I need to upload the same receipt more than once?
No. If a receipt has already been uploaded to the expense report, you can select the existing receipt instead of uploading it again.
Why do I need to select a payee or vendor code?
The payee or vendor code connects the expense report to the correct employee vendor record. Depending on your company’s setup, this may be used for reimbursement, invoice creation, export, or payment processing.
What happens after my expense report is approved?
Once approved, the expense report moves to the next step based on your company’s setup. It may be reimbursed directly, converted into an invoice, exported to your AP or accounting system, or paid through VendorPay.
Can an approver reject only one expense row?
Yes. Approvers can reject specific expense rows instead of rejecting the entire report, depending on your company’s approval setup.
Was this article helpful?
That’s Great!
Thank you for your feedback
Sorry! We couldn't be helpful
Thank you for your feedback
Feedback sent
We appreciate your effort and will try to fix the article