Overview
Ottimate has updated the approval policy configuration experience to make policy setup cleaner and easier to manage.
Approval policies for card transactions, cards, and reimbursements are now managed from one unified area. When creating a new policy, admins will first choose the policy type, and Ottimate will show the relevant setup options based on that selection.
This update also improves reimbursement policy setup and changes how receipt rules work.
What changed?
The main changes are:
Card transaction, card, and reimbursement policies are now managed from one unified approval policy area.
Admins now select the policy type when creating a new policy.
Reimbursement policies can now apply to:
Single reimbursements only
Expense reports only
Both single reimbursements and expense reports
The policy list view now shows the policy type more clearly.
Receipt rules now determine when receipt upload is mandatory.
Receipt rules no longer configure a separate receipt approval workflow.
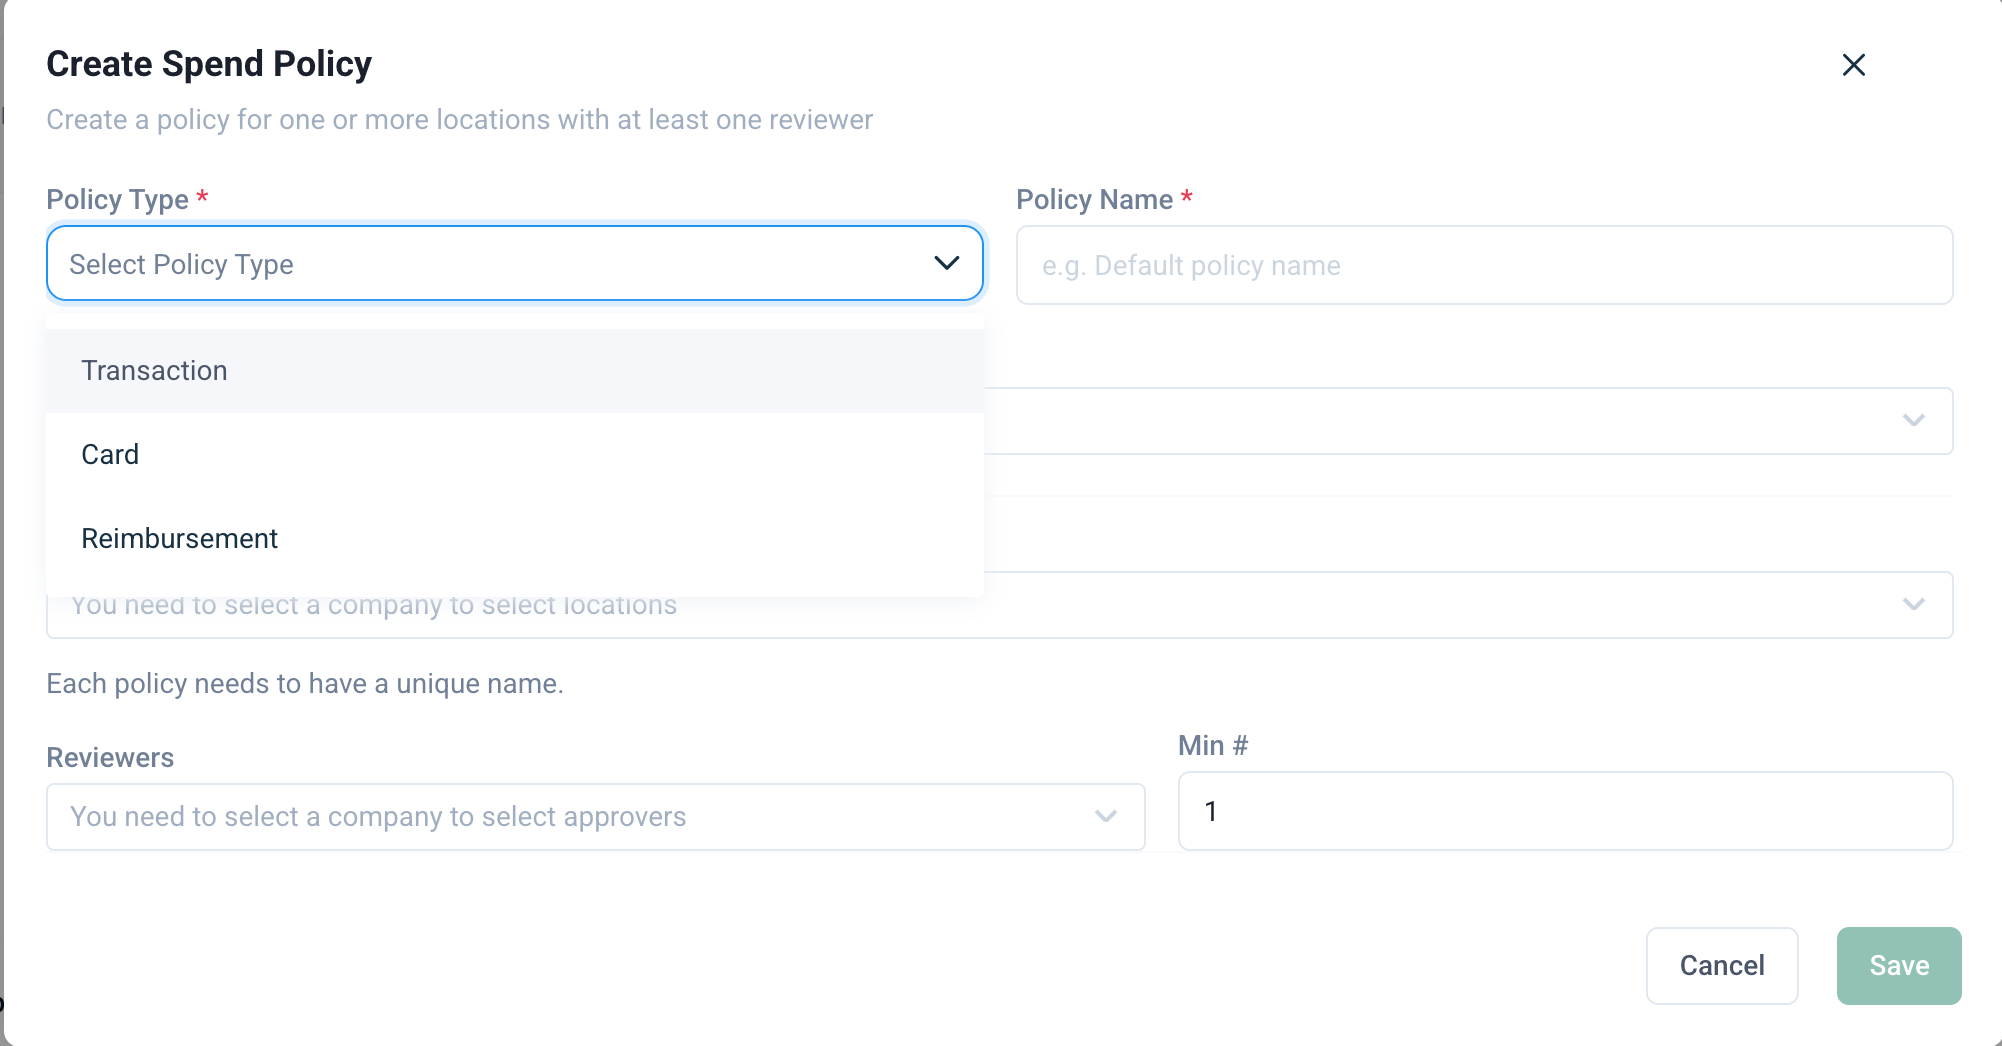
Creating a new approval policy
To create a new approval policy:
Go to the approval policy configuration area.
Click to create a new policy.
Select the policy type.
Complete the policy setup using the available conditions and options.
Save the policy.
The options shown during setup depend on the policy type selected.
For example:

Creating reimbursement approval policies
When creating a reimbursement approval policy, you can now choose where the policy should apply.
You can apply the policy to:
Single reimbursements only
Expense reports only
Both single reimbursements and expense reports
If the same approval workflow should apply to both single reimbursements and expense reports, you no longer need to create two separate policies. You can create one reimbursement policy and select both options.

Viewing policy types in the list view
The approval policy list view now shows the policy type more clearly.
This helps admins quickly understand whether a policy applies to:
Card transactions
Cards
Single reimbursements
Expense reports
Both single reimbursements and expense reports
This makes it easier to review existing policies and avoid duplicate or mismatched configurations.

Receipt rules
Receipt rules now control when receipt upload is mandatory.
Previously, receipt rules could be configured like approval rules. However, Ottimate does not have a separate receipt approval workflow. Approvals happen at the transaction level.
Going forward, receipt rules are used to define when a receipt is required.
For example:
If a transaction amount is greater than $5, you can make receipt upload mandatory.
If the transaction does not meet the rule condition, receipt upload can remain optional.
Creating a new receipt rule
When creating a new receipt rule, you can configure details such as:
Conditions
Company
Location
You will no longer see approver configuration options when creating new receipt rules.
Receipt rules should be used to decide whether a receipt is required, not who should approve the receipt.


Card-level receipt requirements
Card-level receipt requirement settings will continue to exist.
This means receipt requirements can be configured in two ways:
At the card level
Through receipt requirement rules based on transaction conditions
For example, an admin may require receipts for a specific card or create a rule that requires receipts only when a transaction meets certain conditions.
What happens to existing receipt policies?
If your company already had receipt policies configured before this update, those legacy receipt policies will still be shown for informational purposes.
However, legacy receipt policies cannot be edited.
You can delete a legacy receipt policy and create a new receipt requirement rule if needed.
What this update does not change
This update does not change the underlying approval workflow behavior.
Existing approval policies will continue to work as before. The main changes are around:
Where policies are configured
How new policies are created
How reimbursement policies can be applied
How receipt rules are configured
This update does not introduce a separate receipt approval workflow.
Common scenarios
Frequently Asked Questions
Are approval policies functionally changing?
No. The underlying approval policy behavior is not changing. The creation flow and list view experience have been improved.
Why are card transaction, card, and reimbursement policies now under one area?
They have been consolidated to reduce navigation clutter and make policy setup easier for admins.
Can a reimbursement policy apply to both single reimbursements and expense reports?
Yes. You can create one reimbursement policy and apply it to single reimbursements, expense reports, or both.
Do I still need to create separate policies for single reimbursements and expense reports?
No, not if the same approval workflow should apply to both. You can create one reimbursement policy and select both options.
What changed with receipt policies?
Receipt policies have been changed into receipt requirement rules. Instead of configuring receipt approvers, admins can configure when receipt upload is mandatory.
Why were receipt approval options removed?
Ottimate does not have a separate receipt approval workflow. Approval happens at the transaction level, so receipt rules now focus on whether a receipt should be mandatory.
What happens to existing receipt policies?
Existing receipt policies will be carried over and displayed for informational purposes. They cannot be edited, but they can be deleted.
Can I create new receipt approval policies?
No. New receipt rules only support receipt requirement configuration, such as conditions, company, and location. Approver options are not shown.
Do card-level receipt requirements still work?
Yes. Admins can still configure receipt requirements at the card level. Receipt requirement rules provide an additional way to make receipts mandatory based on transaction conditions.
Need help?
If you are unsure how to configure an approval policy or receipt requirement rule, contact Ottimate Support.
Was this article helpful?
That’s Great!
Thank you for your feedback
Sorry! We couldn't be helpful
Thank you for your feedback
Feedback sent
We appreciate your effort and will try to fix the article