Overview
To streamline how we verify business and banking information, Ottimate is integrating with Stripe and moving to a single, unified KYB/KYC (Know Your Business/Know Your Customer) verification process. Your business and banking details have already been automatically migrated to the new system — all that's left is a quick reconfirmation on your end. This guide walks you through each step.
Step 1: Open Account Administration
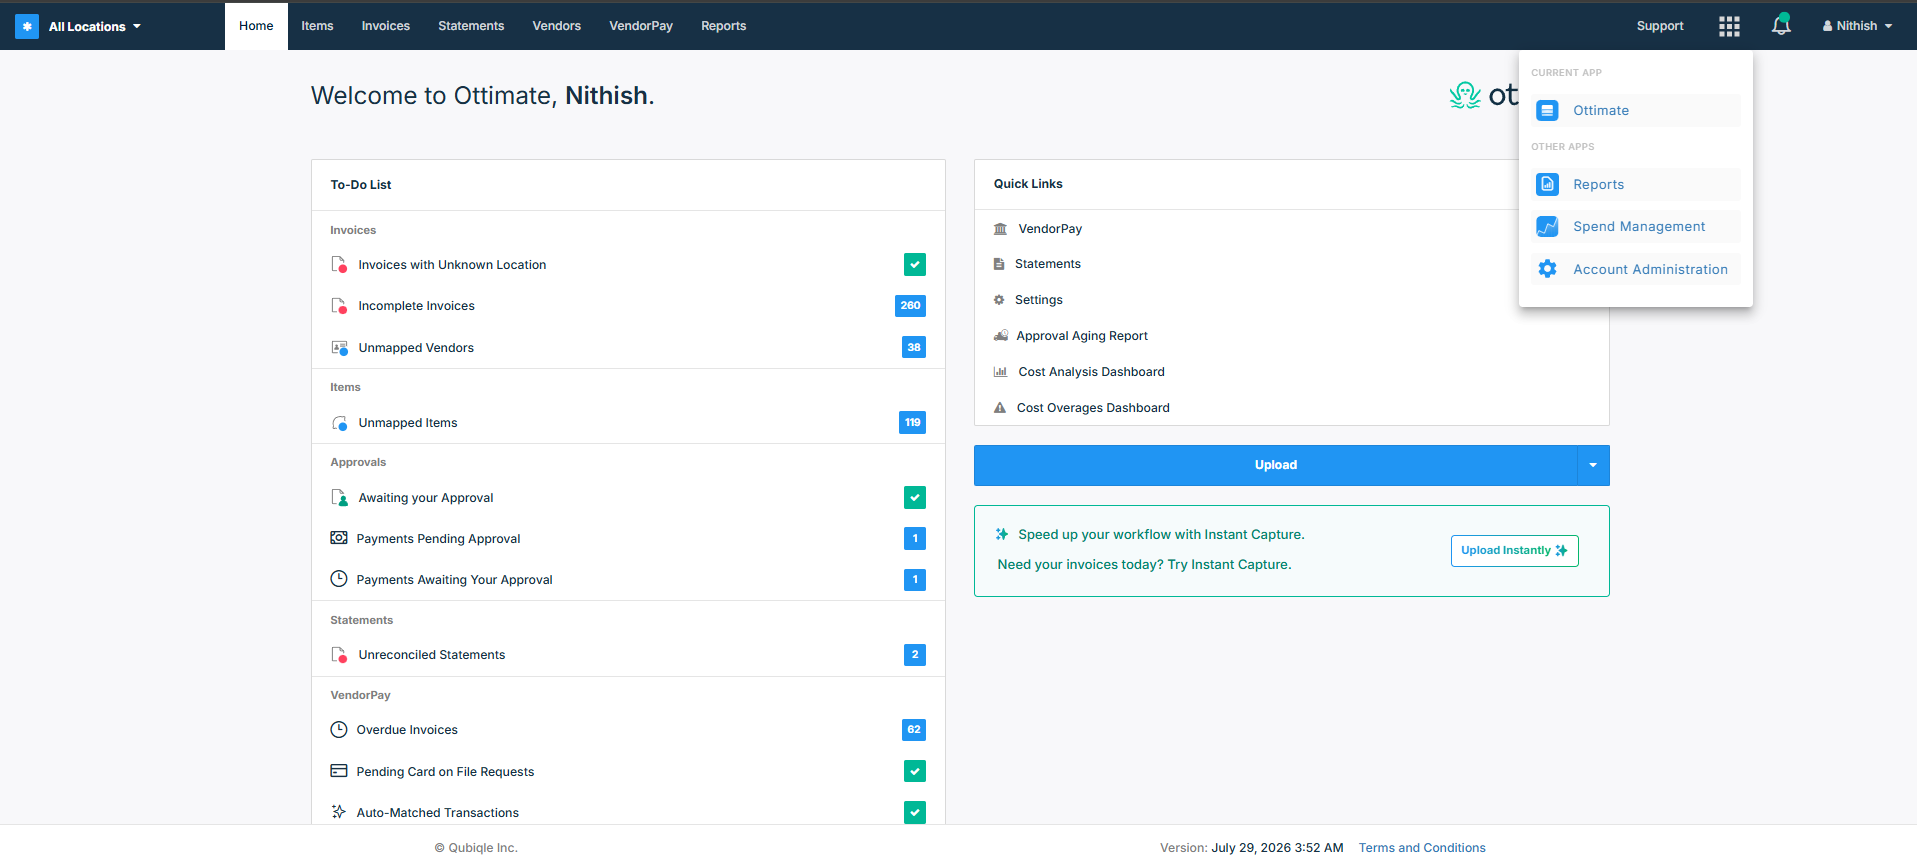
From the Home screen, click the grid icon (9 dots) in the top-right corner, next to the Ottimate logo.
From the menu that appears, select Account Administration.
Step 2: Locate Your Migrated Businesses
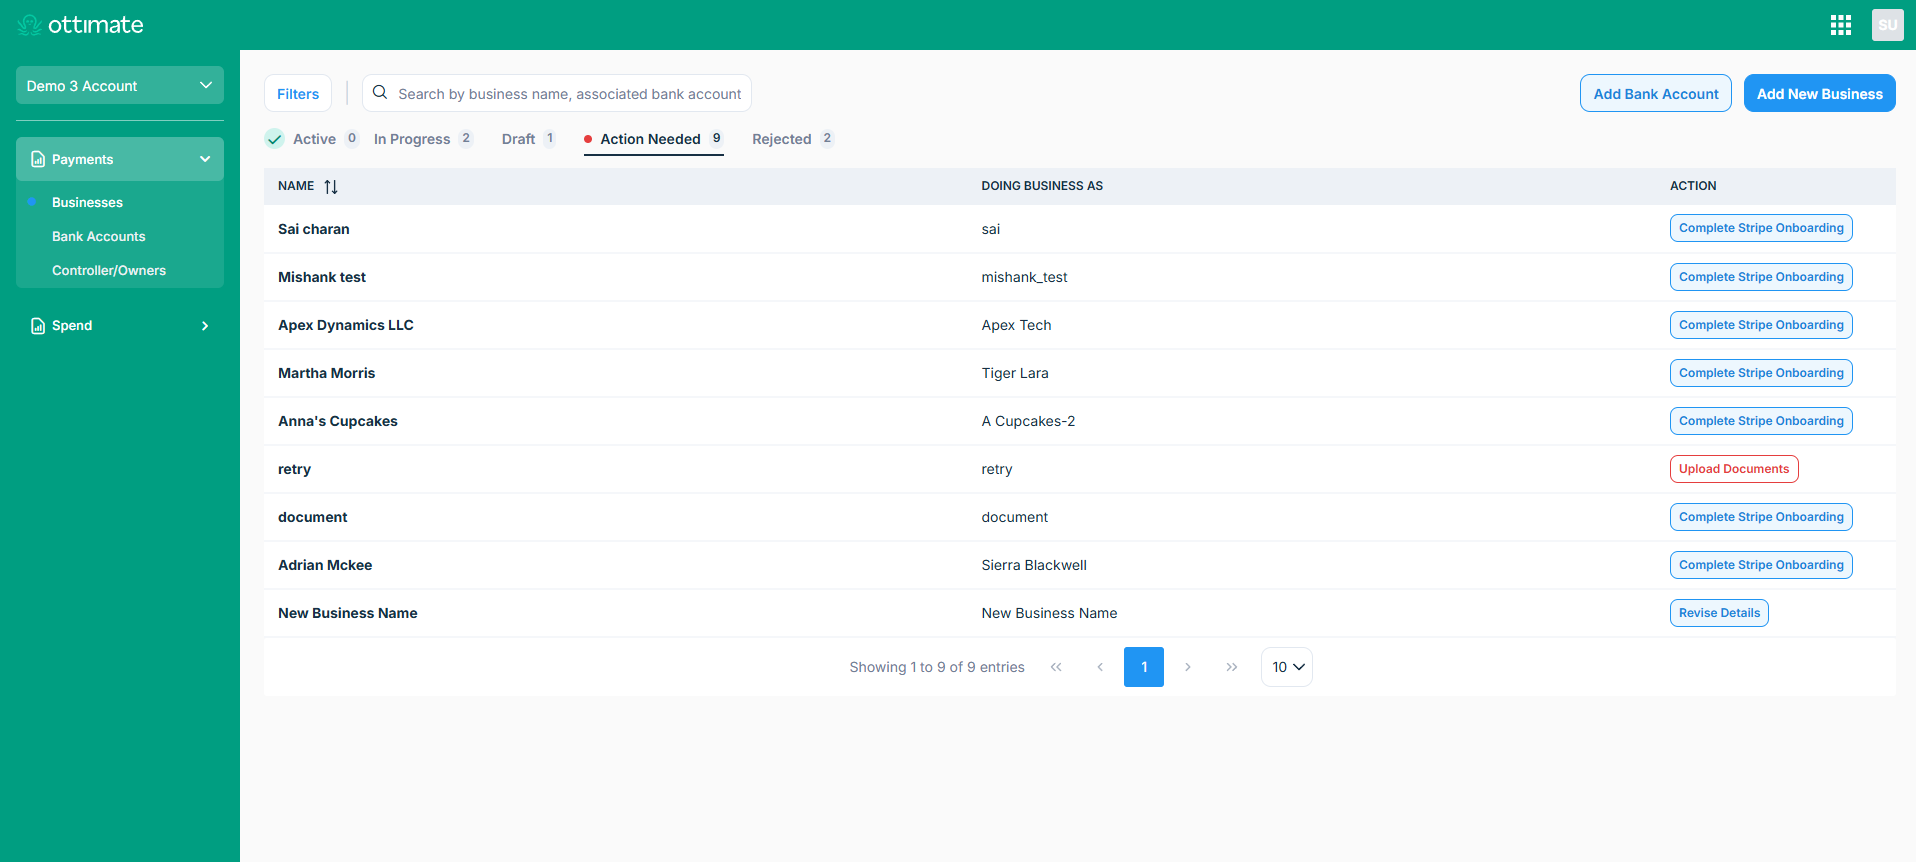
From the left navigation menu, expand Payments, then click Businesses.
Click the Action Needed tab. This is where all of your migrated businesses will appear.
What "Action Needed" means for you:
As part of the migration, your existing businesses have been moved into the new verification system. You'll see them listed here with a Complete Stripe Onboarding action next to each one — this is the step required to finish verification under the new process.
Note: Your payments are not affected by this. While your business shows under Action Needed, payments will continue to be processed on schedule as usual. This tab simply lets you complete the final Stripe verification step for each business.
Step 3: Complete Stripe Onboarding
From the Action Needed tab, click Complete Stripe Onboarding next to the business you want to verify.
A Stripe Account Onboarding pop-up will appear, showing the bank account(s) on file for that business that still need to be authorized.
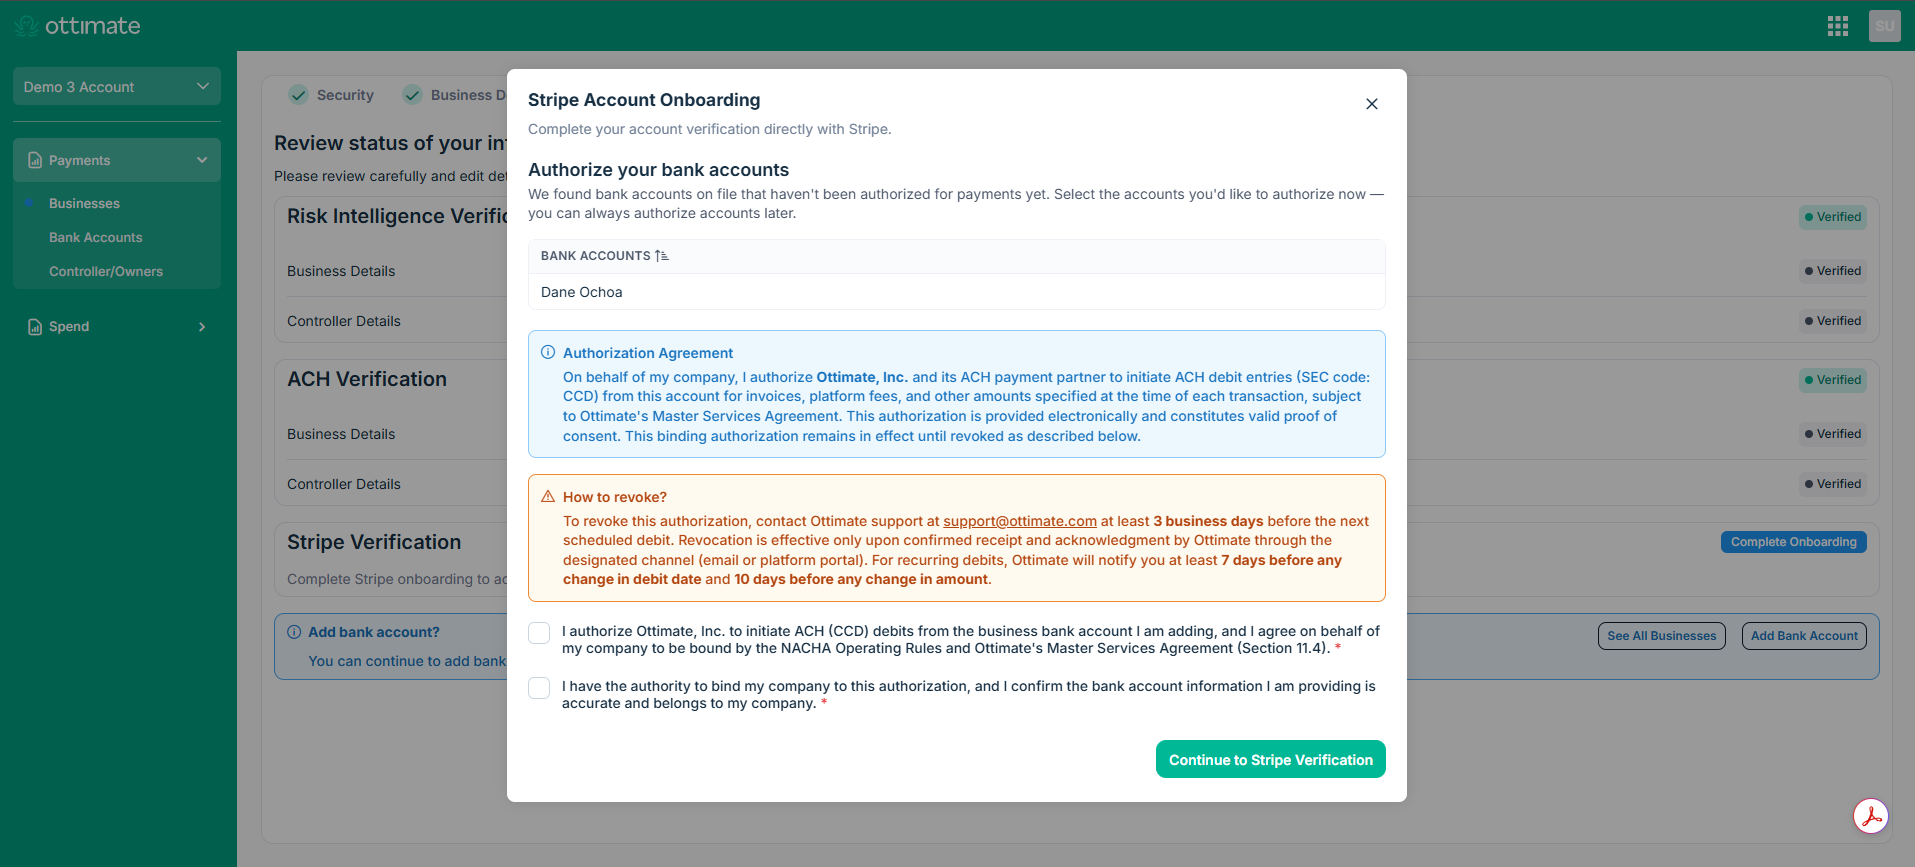
Review the Authorization Agreement. This explains that by proceeding, you're authorizing Ottimate and its ACH payment partner to debit the selected account(s) for invoices, platform fees, and other amounts tied to your transactions — and outlines how you can revoke this authorization later if needed (via Ottimate support, with advance notice as described in the agreement).
Check both boxes to confirm:
You authorize the ACH debit setup described above, and
You have the authority to bind your company to this agreement, and the bank account details provided are accurate.
Click Continue to Stripe Verification to proceed.
Step 4: Enter Business Details
After clicking Continue, the screen may take a moment to process before loading the next section. Any information Ottimate already has on file will be auto-populated here — simply review it for accuracy and fill in any remaining fields:
Legal Business Name — Enter the legal, registered name of your business.
Business Name (DBA) — Enter your "doing business as" name, if different from your legal business name.
Employer Identification Number (EIN) — Enter your business's EIN.
Business Address — Enter your business's registered address.
Business Phone Number — Enter a phone number registered in the same country as your account.
Industry — Select the option that best matches the goods or services your business provides. This selection also determines your business's merchant category code (MCC), which helps satisfy risk and compliance requirements.
Estimated worker count — Enter an estimated upper bound of employees, contractors, and vendors currently working for your business.
Annual revenue — Enter the gross annual revenue from your most recent fiscal year. If your business has not yet completed one full fiscal year, enter 0. (There's no minimum revenue requirement.)
Fiscal year end — Enter the close-out date of your most recent fiscal year. If your business is net new, enter the last working day of the previous year.
Business website — Enter your business website URL. If you don't have one, click Don't have a website? Add a product description instead and describe your business there.
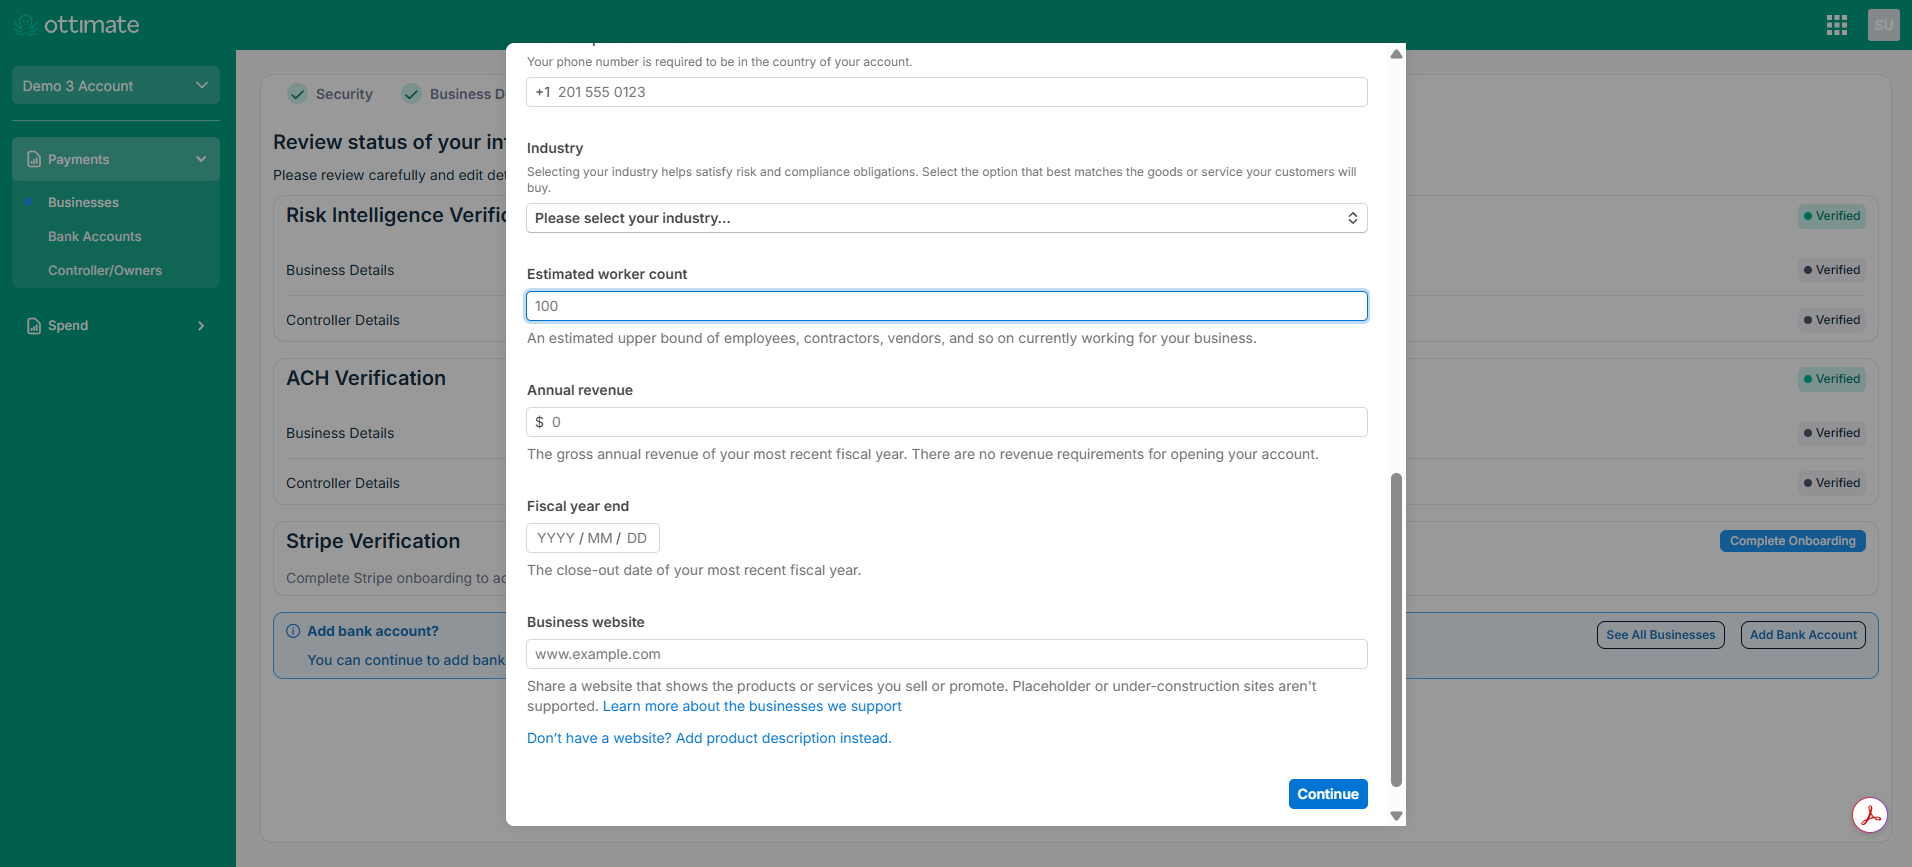
Once all fields are filled in, click Continue.
Step 5: Review Management & Ownership, and Submit
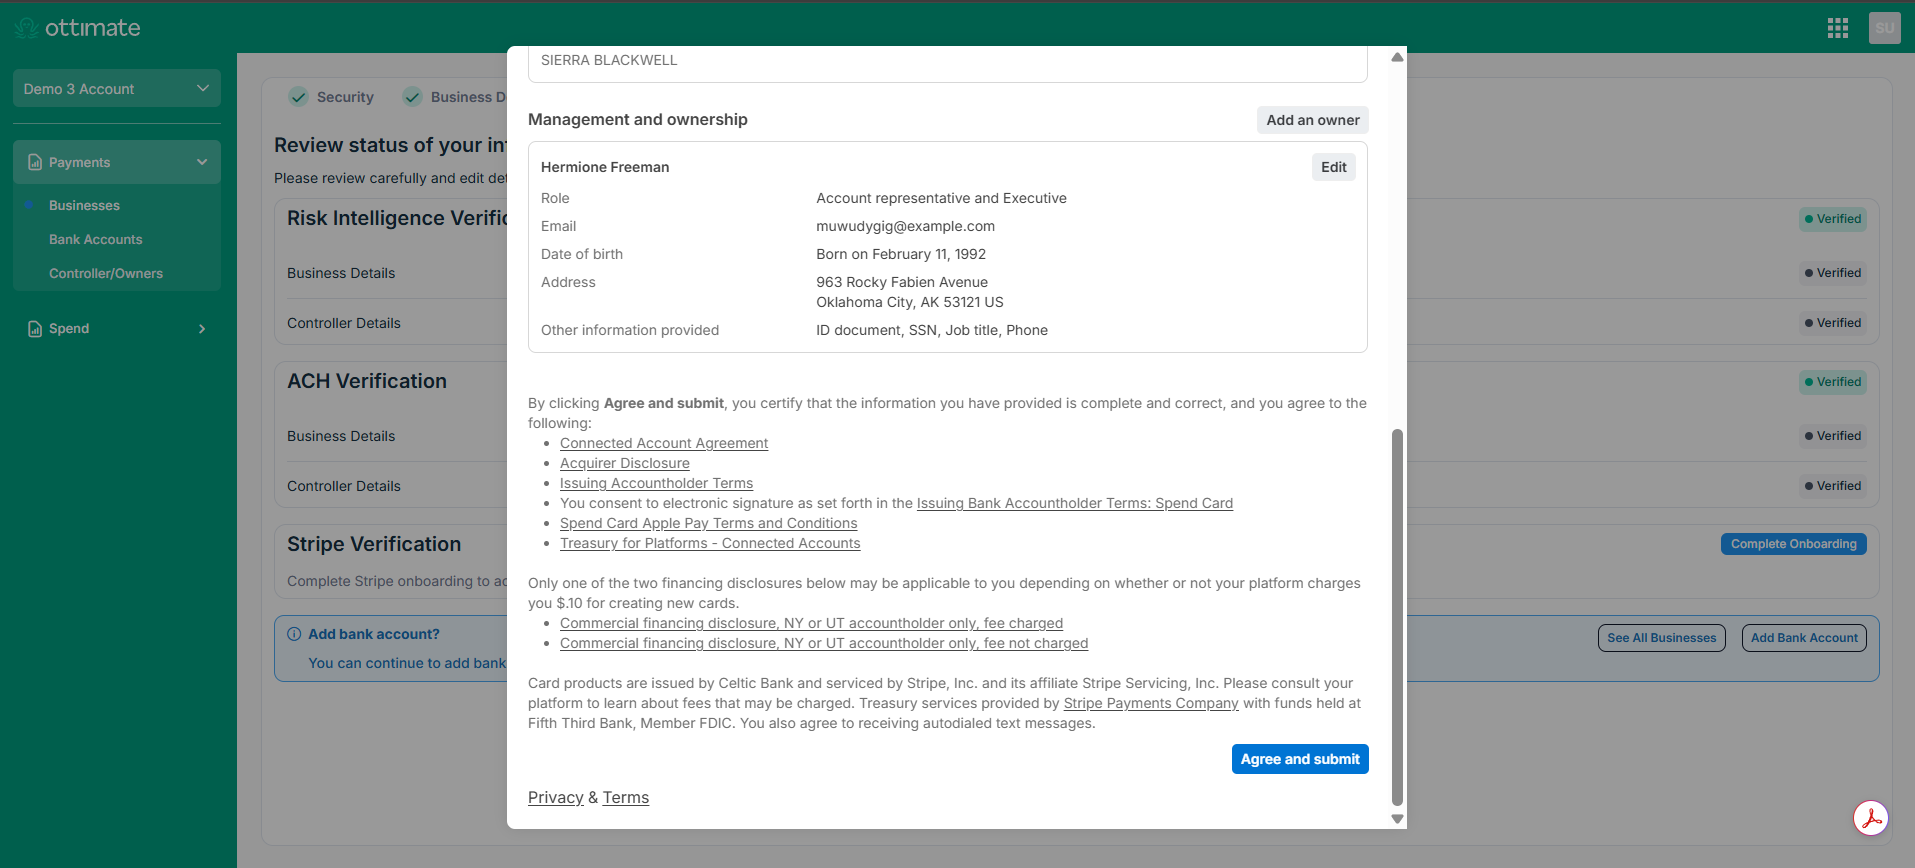
Review the Management and Ownership section, which lists the account representative(s)/owner(s) on file for the business.
Confirm and update the following details if needed for each representative/owner:
Role
Email
Date of birth
Address
Phone Number
SSN
Review listed agreements (Connected Account Agreement, Acquirer Disclosure, Issuing Accountholder Terms, and other applicable disclosures).
Click Agree and submit.
What happens next: Stripe typically takes a few minutes to verify your business details. You don't need to stay on this screen while verification completes — feel free to navigate away, and we'll notify you once it's done. If Stripe needs any additional information, you'll receive an email within 48 hours letting you know what's required.
Step 6: Provide Supporting Documentation (If Requested by Stripe)
If your business details cannot be verified automatically, Stripe may request supplementary documentation to satisfy KYC compliance standards. Any outstanding requirements will be flagged within the onboarding form or communicated once your initial submission has been reviewed.
Return to Payments > Businesses > Action Needed.
Click Revise Details next to the business requiring additional documentation.
A pop-up will appear where you can upload the required documents. Enter/attach the requested information and submit.
If further verification is requested, you will need to submit documentation from one or more of the following categories:
Category 1: Proof of Identity
To verify your identity, you may provide a Passport, Driver's License, or National ID.
Document guidelines:
The file must be a vibrant, high-resolution photo or digital scan.
Only valid, unexpired identification is permitted.
Standard black-and-white photocopies will be rejected.
Ensure both the front and back of licenses or ID cards are captured.
Category 2: Proof of Home Address
Accepted documentation includes a recent Utility bill or Bank statement.
Address requirements:
Documentation must have been generated within the previous 3 to 6 months.
The residential address must correspond to the representative listed in the system.
Category 3: Proof of Legal Entity
Please upload your Articles of Incorporation, an IRS 147C, or an SS-4 confirmation letter.
Entity verification criteria:
The registered Business Name and EIN must mirror the details provided in your Stripe profile.
Step 7: Confirm Completion
While Stripe is verifying your business details, the business will appear under the In Progress tab in Payments > Businesses. Clicking on the business here shows a summary of its current status and what's happening at each stage of verification.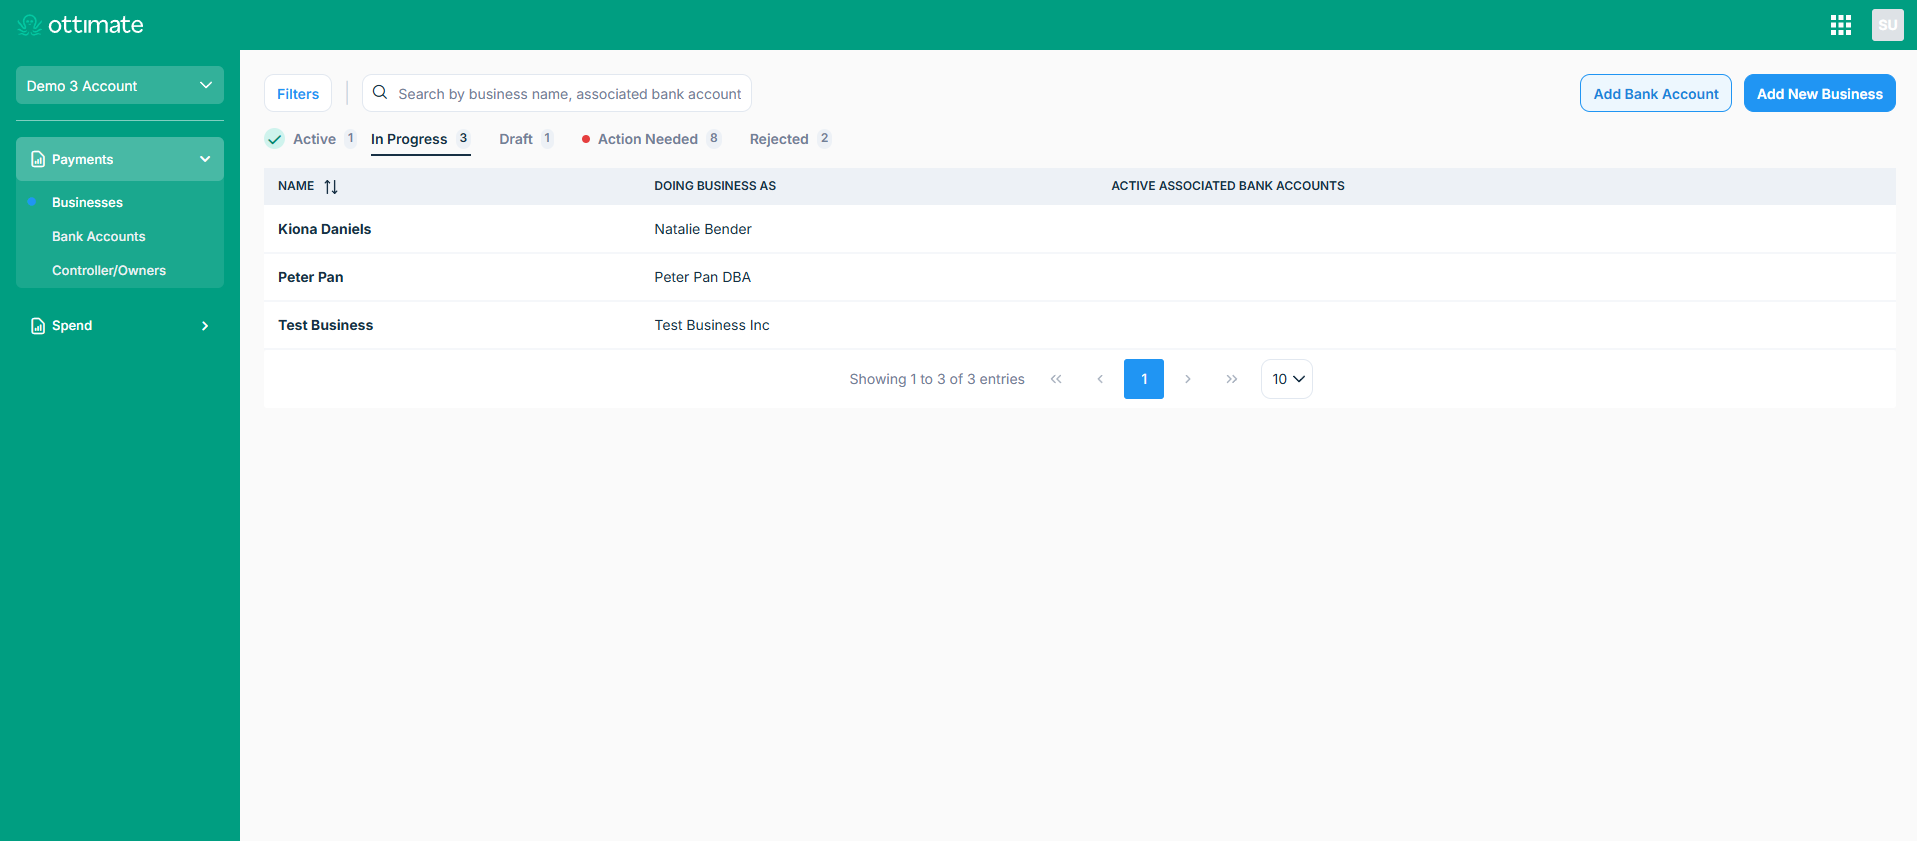
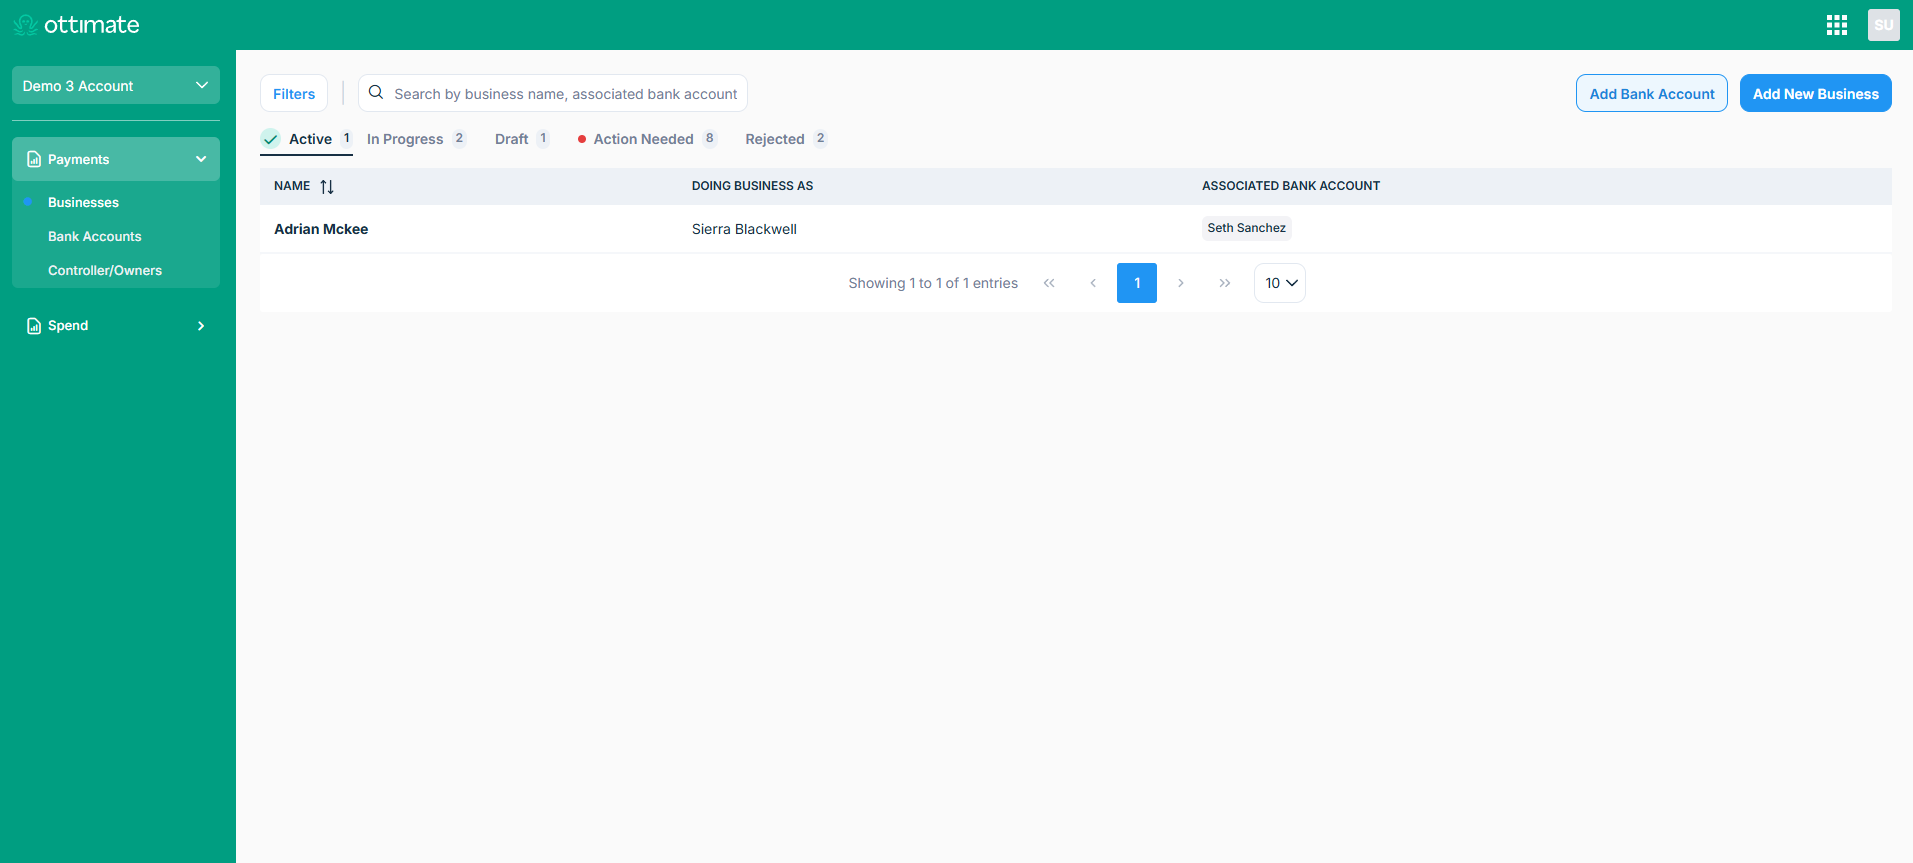
Once Stripe has finished verifying your business, no further action is needed. Your business will now appear under the Active tab, with its associated bank account listed.
Auto-onboarding of bank accounts
Once business verification is complete, your bank accounts will automatically onboard to Stripe. No further action is required, and all future payments will be processed through Stripe.
Step 8: Bank Whitelisting (ACH Debit Filters)
If your organization uses ACH Debit Blocks, Positive Pay, or Fraud Filters, your financial institution will block Stripe payments until authorized. Please provide your bank with the following Stripe Company IDs before migrating:
Company IDs: 1800948598, 4270465600, STRIPE6096, STRIPE6088
Was this article helpful?
That’s Great!
Thank you for your feedback
Sorry! We couldn't be helpful
Thank you for your feedback
Feedback sent
We appreciate your effort and will try to fix the article