Why We Ask for This Information
Ottimate partners with banking and payment providers to move money on your behalf - including paying your vendors and, for some businesses, enabling ACH, card, and cross-border payments. Financial regulations require Ottimate and our banking partners to confirm who your business is and who owns or controls it before enabling these payments. This process is commonly known as KYB (Know Your Business) and KYC (Know Your Customer).
Before You Begin
Verification of the details you submit may take longer and will run in the background - you can continue using Ottimate while it completes. Have the following on hand:
Legal business name, incorporation date, incorporation country/state, and business registration number
Your company's EIN (Employer Identification Number)
Business address, phone number, website, and business email
Full legal name, home address, date of birth, and Social Security Number (or passport) for your company's Controller (e.g., CFO or Managing Director)
The same details for any Beneficial Owner(s) - anyone who owns 25% or more of the company
Step-by-Step Walkthrough
Getting Started: Accessing Account Administration
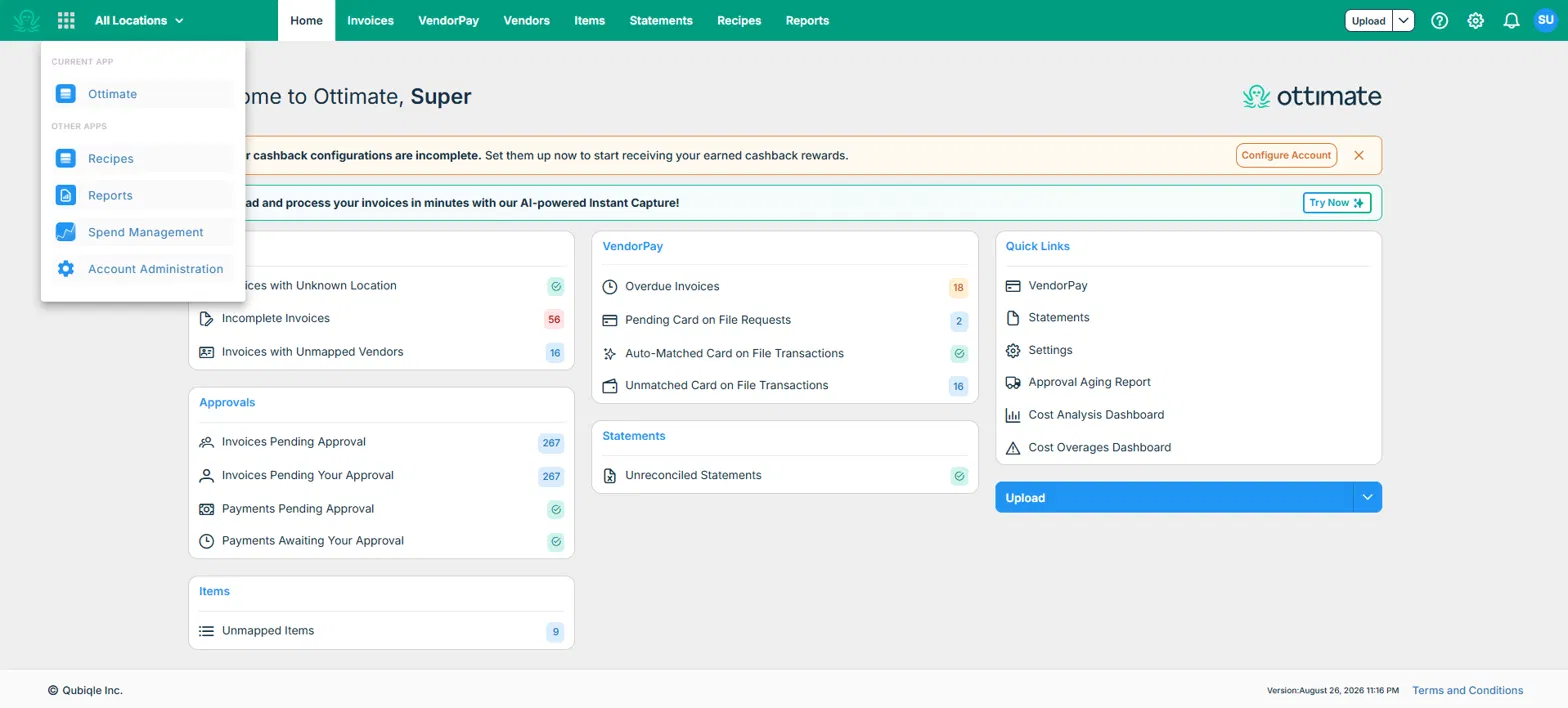
Before you begin, you'll need to navigate to the Account Administration page, where both business and bank account verification live.
Select the 9-dot grid icon in the top right of your Ottimate dashboard, then select Account Administration from the app switcher.
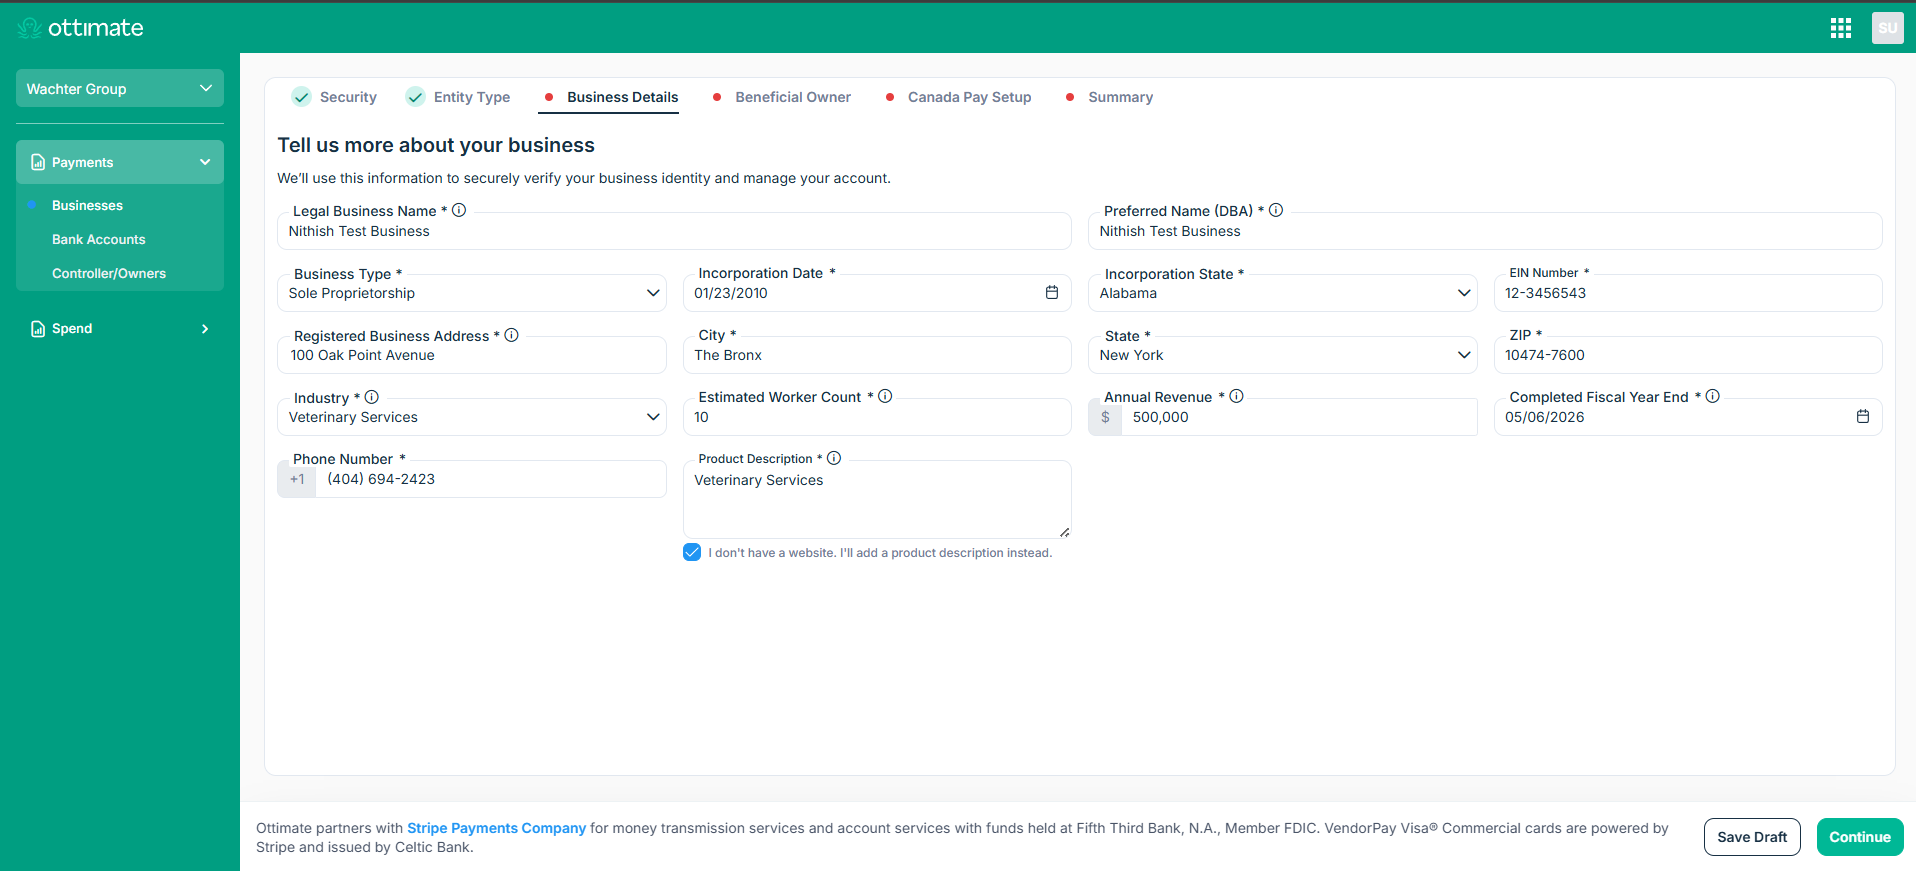
STEP 1 Business Details
Tell us about your company. Some fields may already be filled in based on information we have on file - you can update them here.
Legal business name and DBA / preferred name
Incorporation country, state, date, and business registration number
EIN, business type, and applicant type
Registered business address, phone, website, and business email
Nature of business, number of employees, and business classification (e.g., charitable organization, money service business, high-value dealer) - these help us apply the right level of review
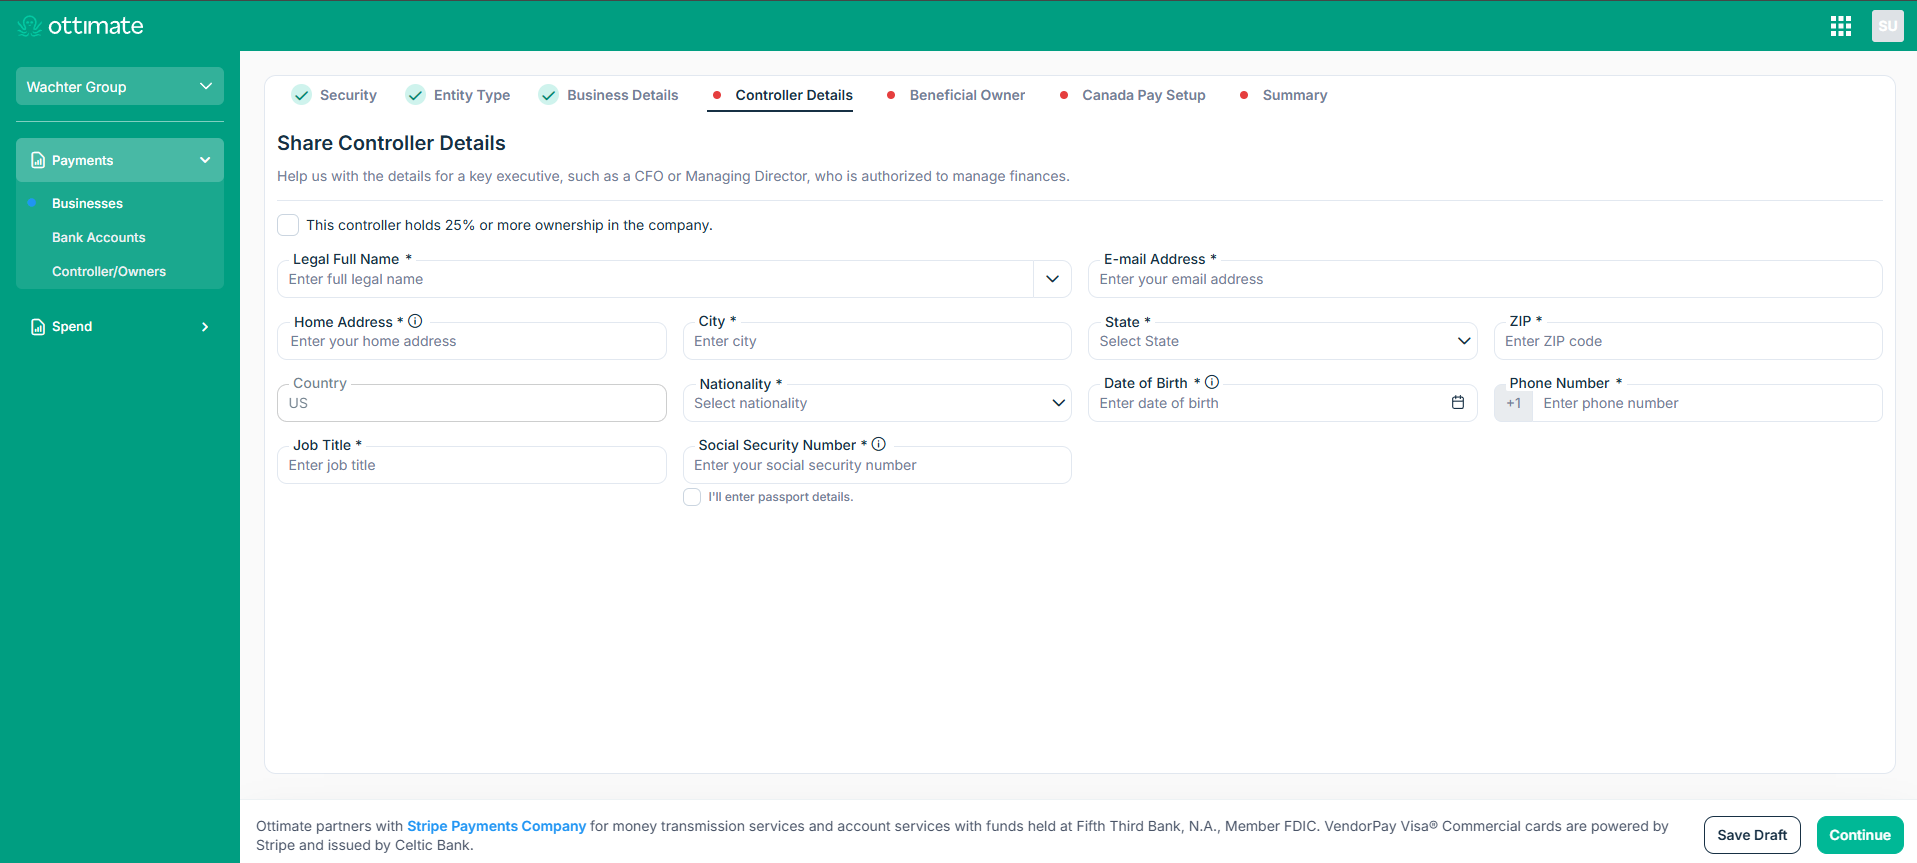
STEP 2 Controller Details
A Controller is a key executive - typically a CFO, Managing Director, or similar - who is authorized to manage the company's finances. We need to verify this person's identity.
Legal full name, home address, date of birth
Social Security Number (or passport details)
Phone number, email address, and job title
Check the box if this person also owns 25% or more of the company
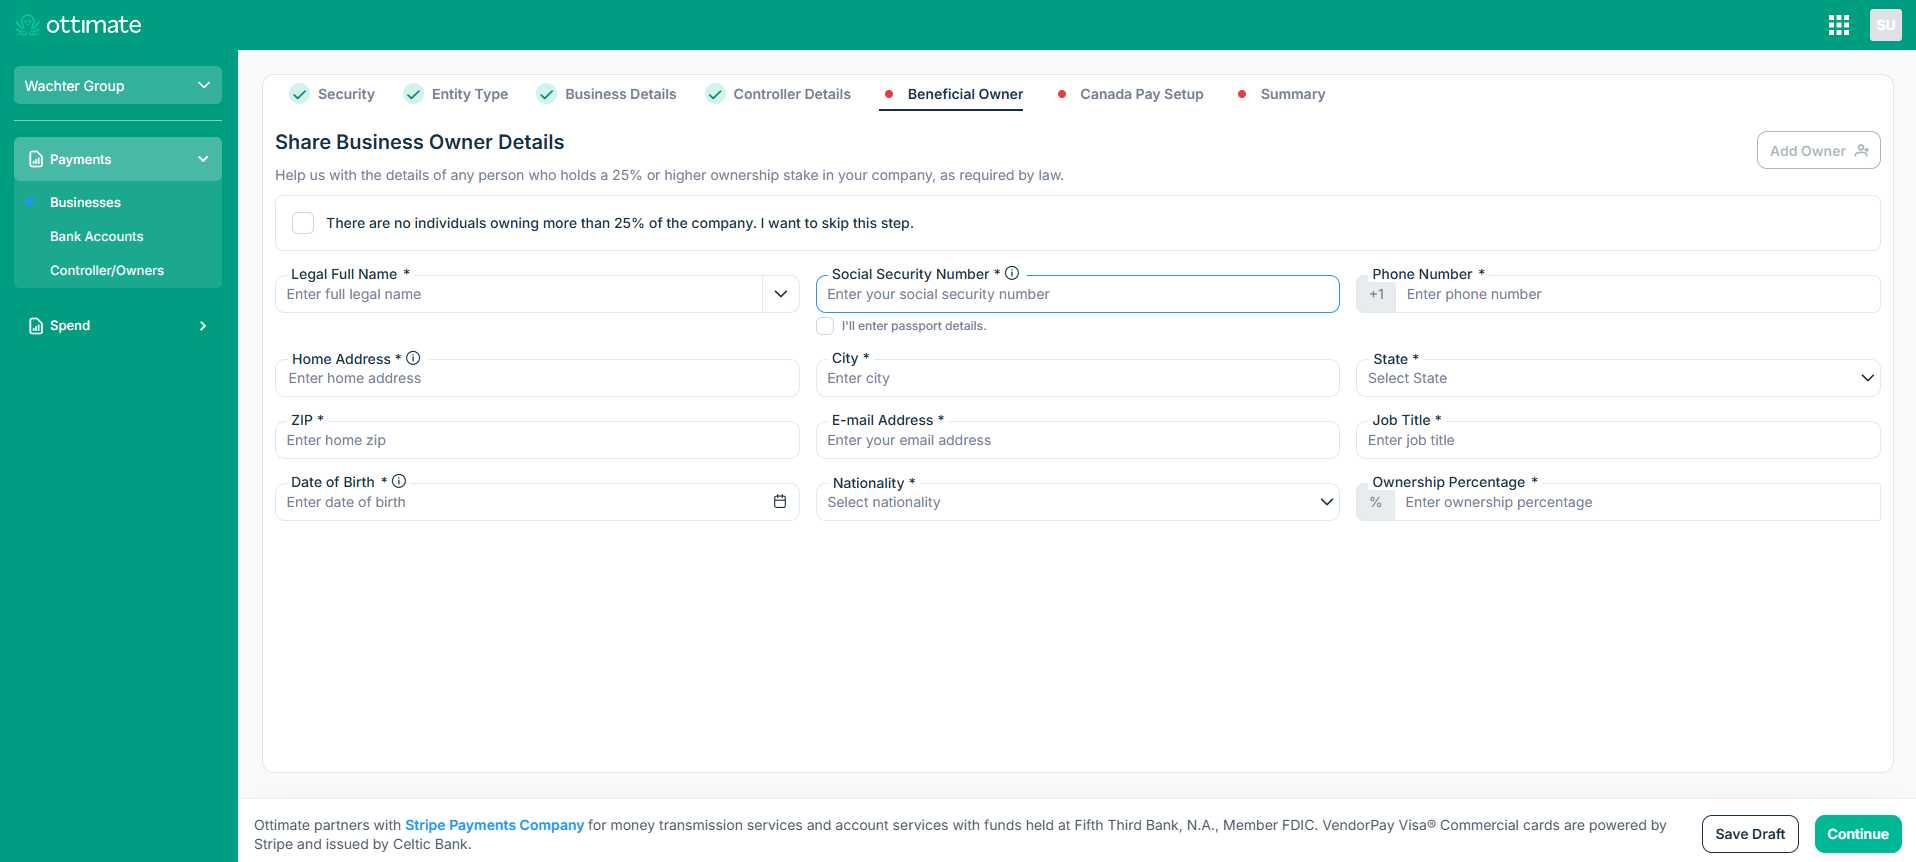
STEP 3 Beneficial Owner Details
A Beneficial Owner is anyone who owns 25% or more of the company. Federal law requires us to collect this information for every qualifying owner.
Add each Beneficial Owner using the "Add Owner" button - there's no limit to how many you can add
If no individual owns 25% or more of the company, check "I want to skip this step"
Required details: legal name, SSN (or passport), registered business address, date of birth, phone, and email
STEP 4 Canada Pay Setup (Optional)
If you pay vendors in Canada, you can unlock Canada Pay here. This step is optional and can be completed later from Settings if you'd rather skip it for now.
Additional business details specific to Canadian payments
Ownership structure, key personnel (e.g., Director, Company Secretary), and Politically Exposed Persons (PEP) disclosures
A Signatory attestation confirming you're authorized to sign on behalf of the business
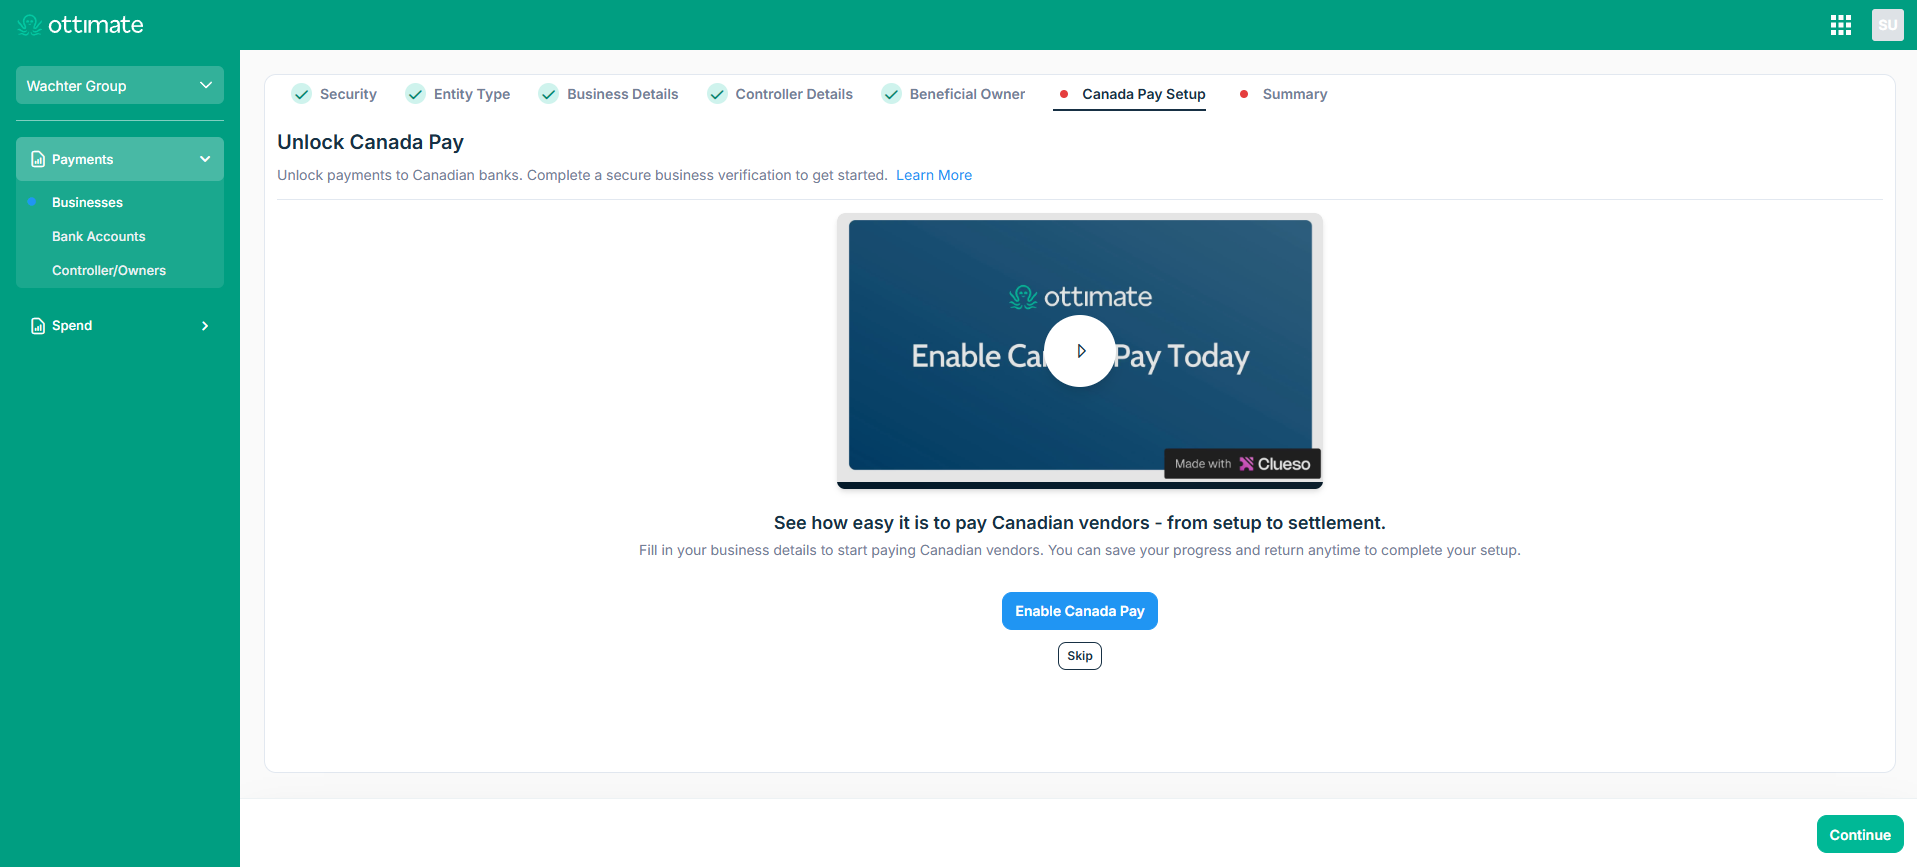
CanadaPay Documentation Link: https://support.ottimate.com/support/solutions/articles/14000164540-canada-pay
STEP 5 Submit for Verification
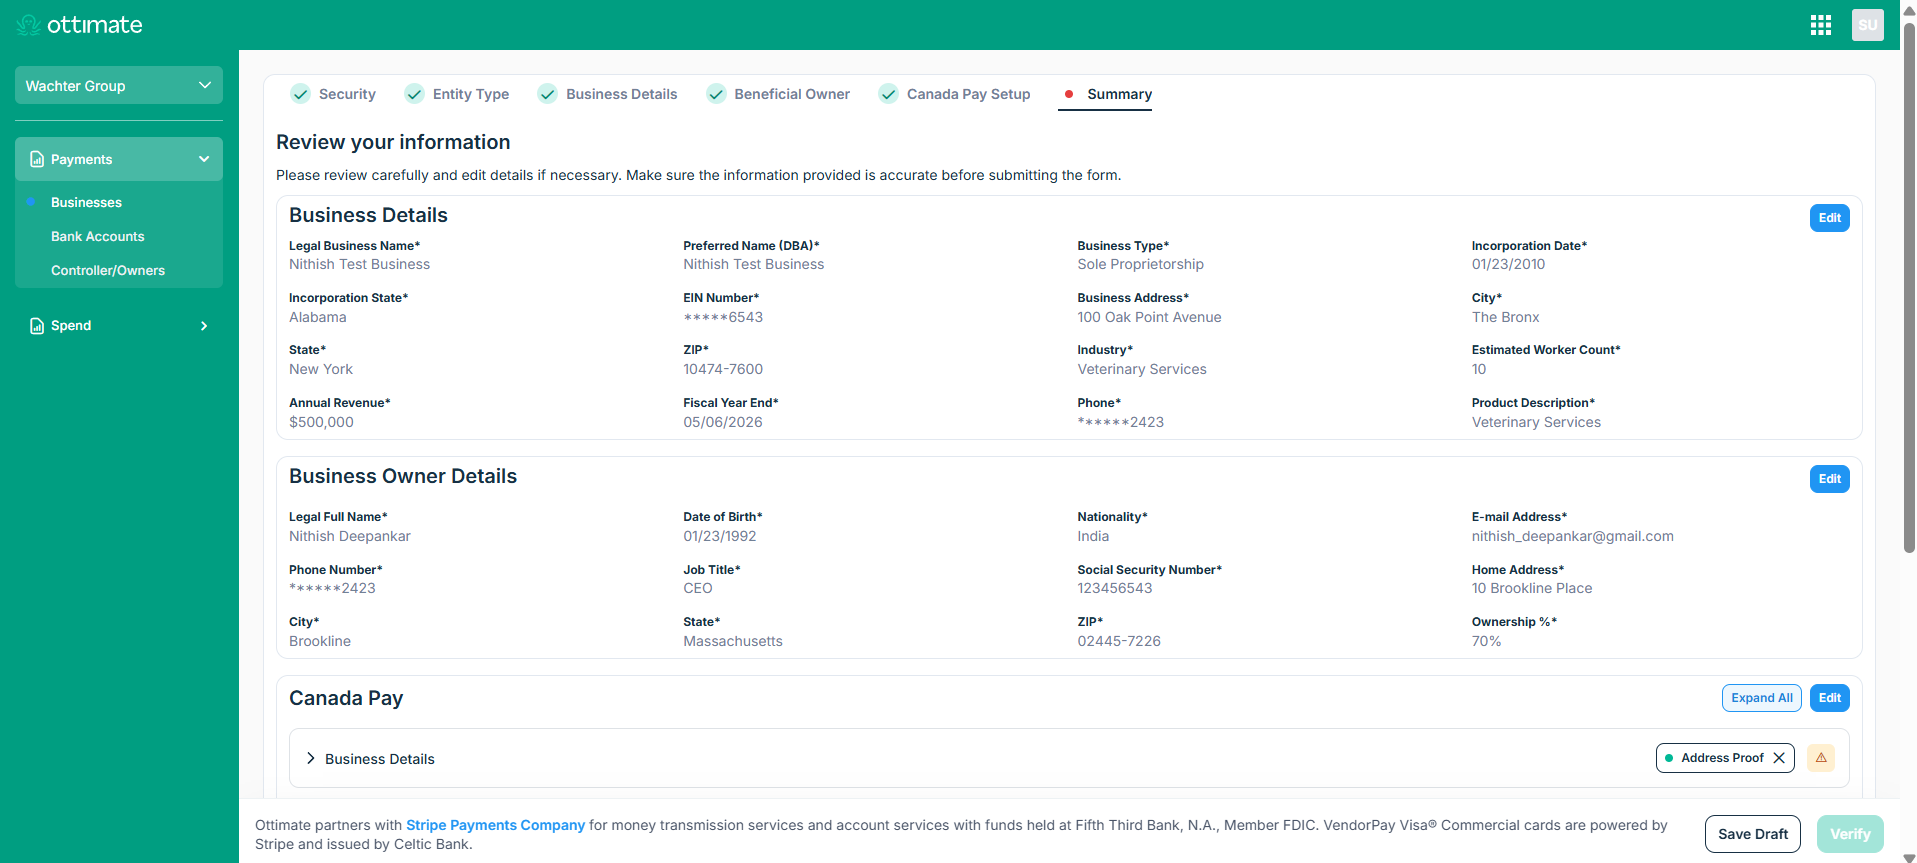
The Summary page brings every section together in one place before you submit for our risk team.
Each section shows its current status so you know exactly what's outstanding
Click "Edit" on any section to make changes before submitting
Fields flagged "Missing Field" must be completed before you can submit
What Happens After You Submit
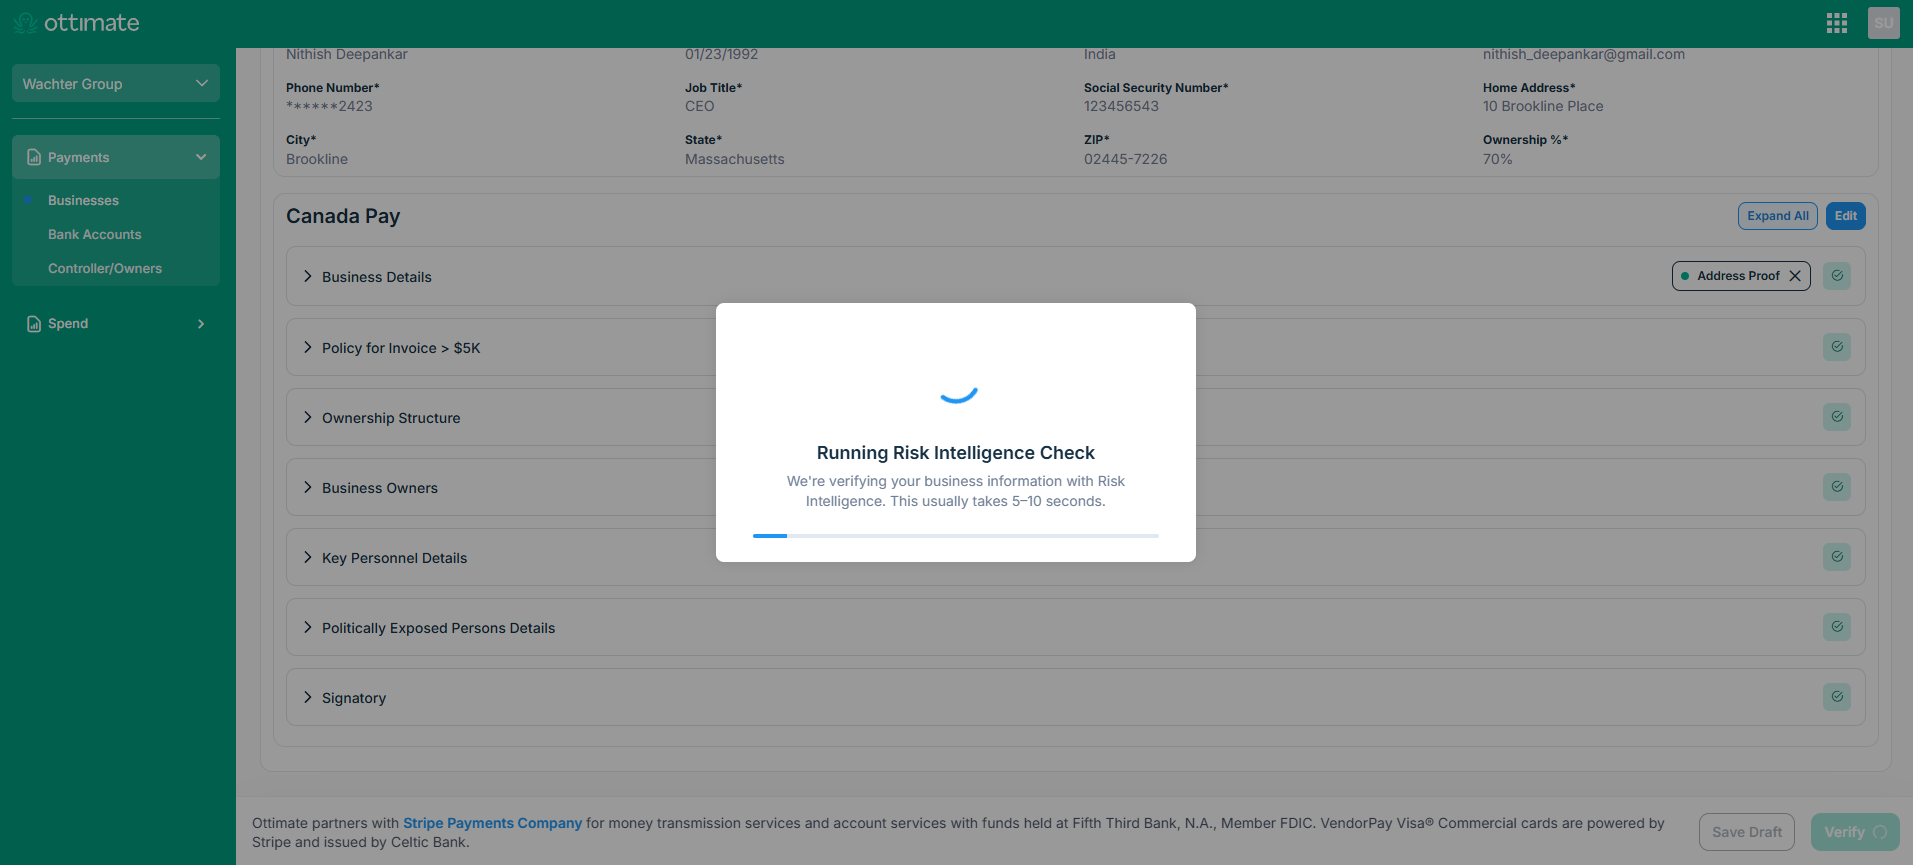
Once submitted, Ottimate runs your information through automated risk verification checks. This typically completes within a few minutes, and you don't need to do anything further while it's in progress.
Once risk verification is complete, the business moves to the Action Needed tab. From here, you'll need to complete Stripe verification (see steps below) to cross-verify your pre-populated details and accept Stripe's terms. Stripe verification is not optional — a business cannot begin making payments until it's complete.
Note: You can add a bank account and submit it for verification while other checks are still in progress. However, you won't be able to make payments until the associated business itself has completed verification.
Completing Stripe Verification
Stripe Verification is the last step to activate payouts on your account. Ottimate partners with Stripe to move money on your behalf, so Stripe needs to independently confirm a few details before your account can send and receive payments.
Stripe Verification only unlocks after Risk Intelligence Verification clears. If your application is flagged for additional risk review, you'll see a status like the one below, and Ottimate's team will follow up by email - this typically takes 1–2 business days.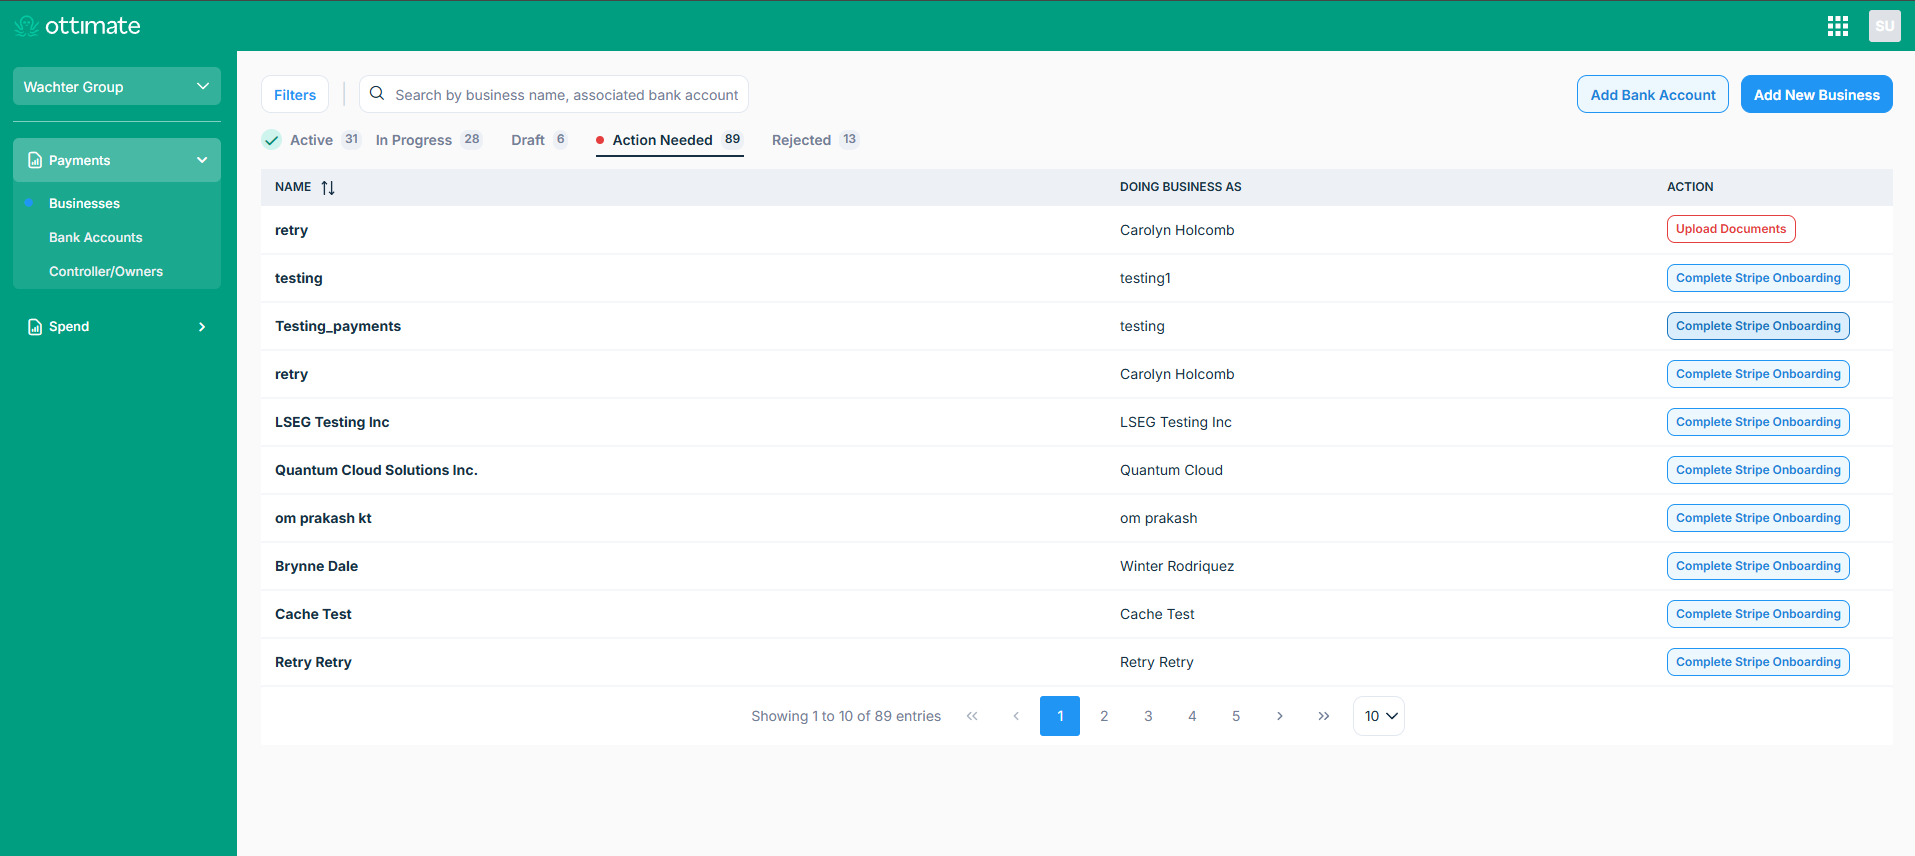
Once Risk Intelligence Verification is complete, click "Complete Onboarding" (or "Complete Stripe Verification") to finish activating your account. Ottimate pre-fills what we already have on file, so you'll only need to verify the details Stripe requires:
Step 1: Authorize Bank Accounts
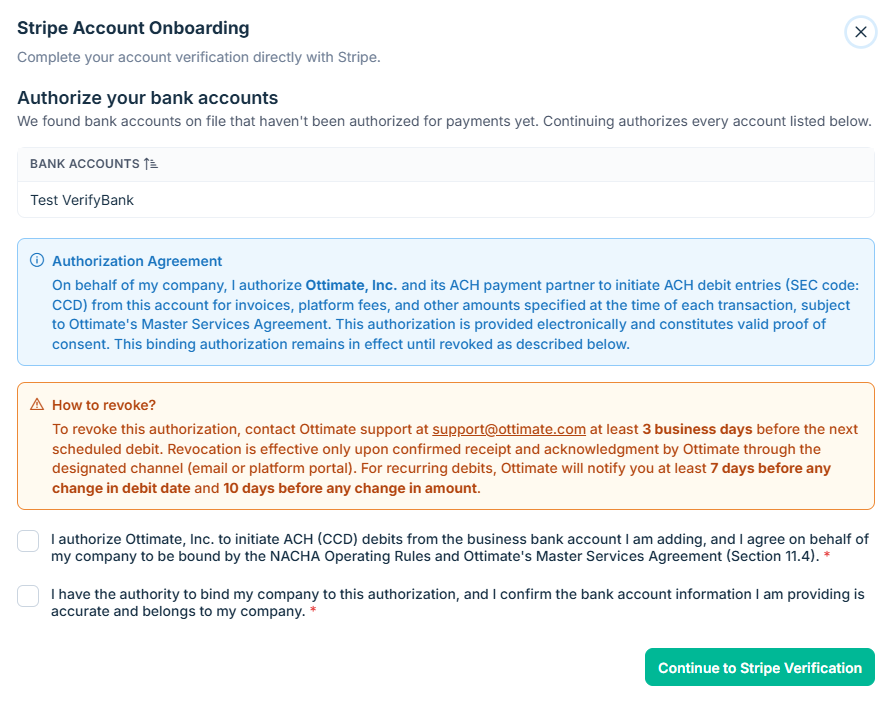
Upon selecting "Complete Stripe Onboarding" next to a business, a pop-up opens prompting you to authorize your bank accounts for payments. Review the listed accounts, read the Authorization Agreement, and check both boxes to confirm authorization before continuing to Stripe Verification.
Step 2: Verify Business Details to Review and Submit
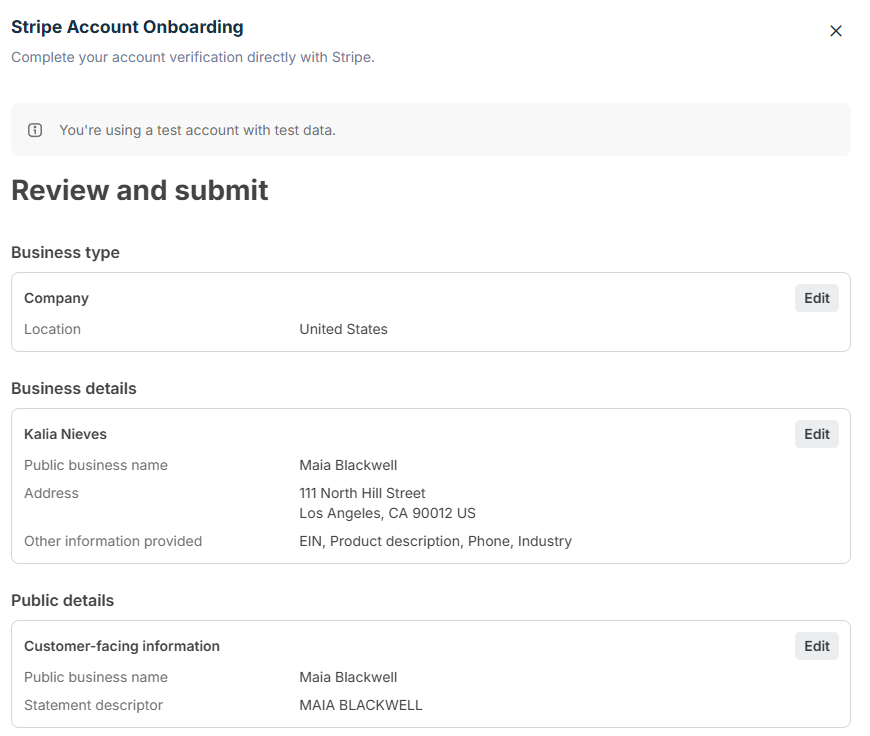
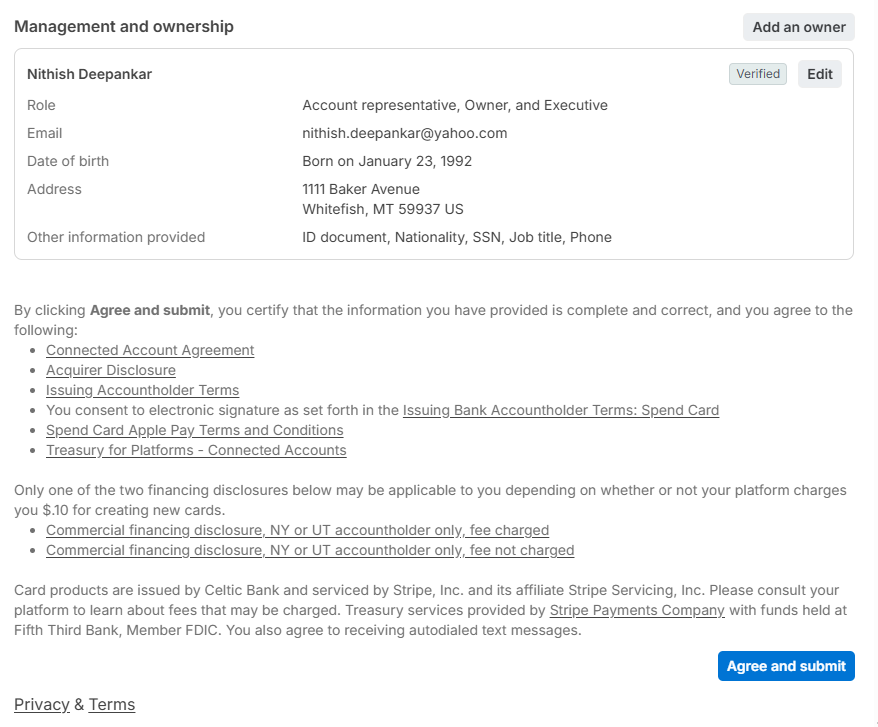
The Review and Submit screen brings together Business Type, Business Details, Public Details, and Management and Ownership for a final check — click "Edit" on any section that needs changes. Since owner identity was already confirmed earlier in the flow, the Management and Ownership section will typically show the owner as "Verified" without requiring a separate business-owner step. Review the certifications and agreements, then select "Agree and submit" to kick off the Stripe verification process.
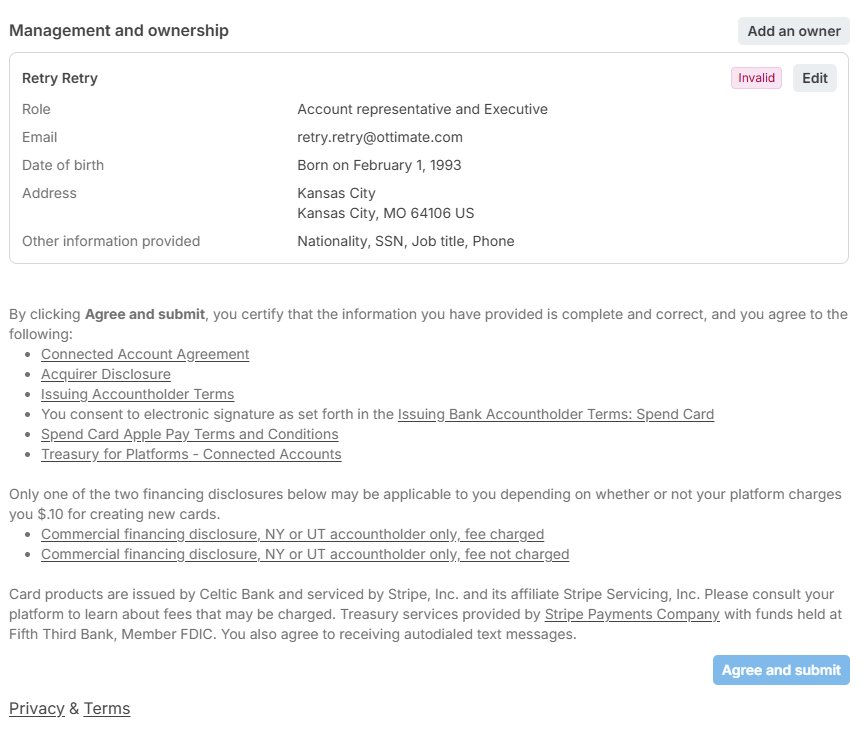
The final step is Review and Submit, which brings together Business Type, Business Details, Public Details, and Management and Ownership for a last check. Verify each section is accurate - click "Edit" on any section that needs changes. Once everything looks correct, review the certifications and agreements, then select "Agree and submit" to complete Stripe verification.
Step 5: Verification In Progress and Completion
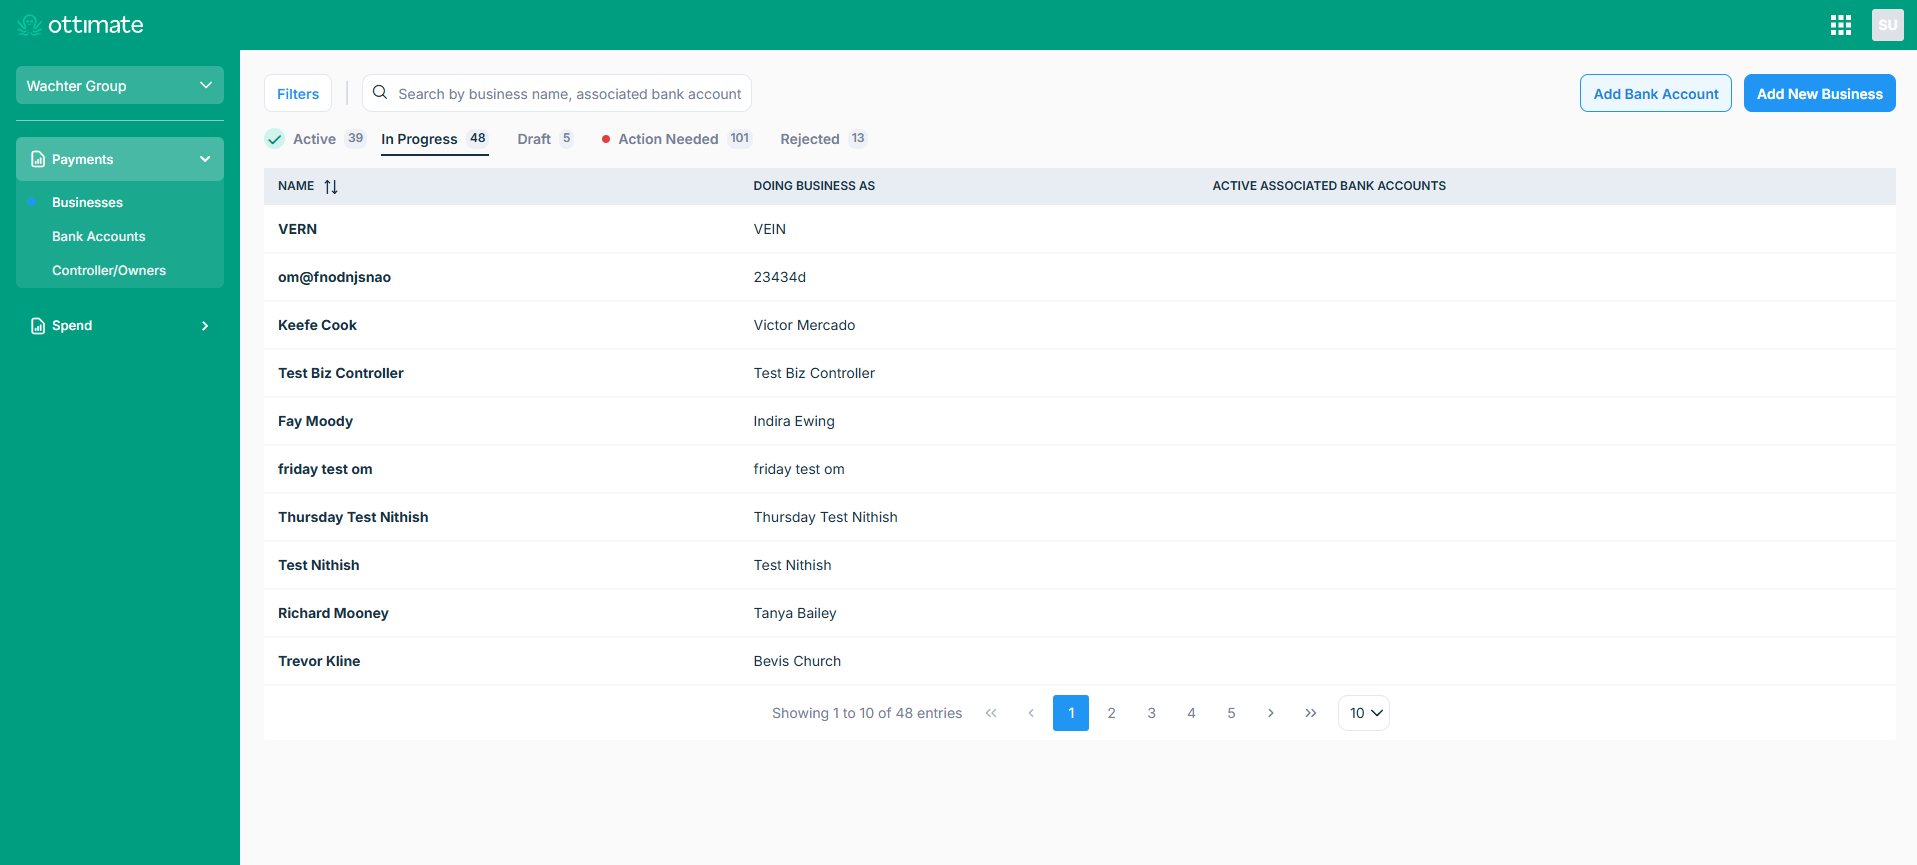
Once you select "Agree and submit," the business will display under the "In Progress" tab on the Businesses page while Stripe verification is underway.
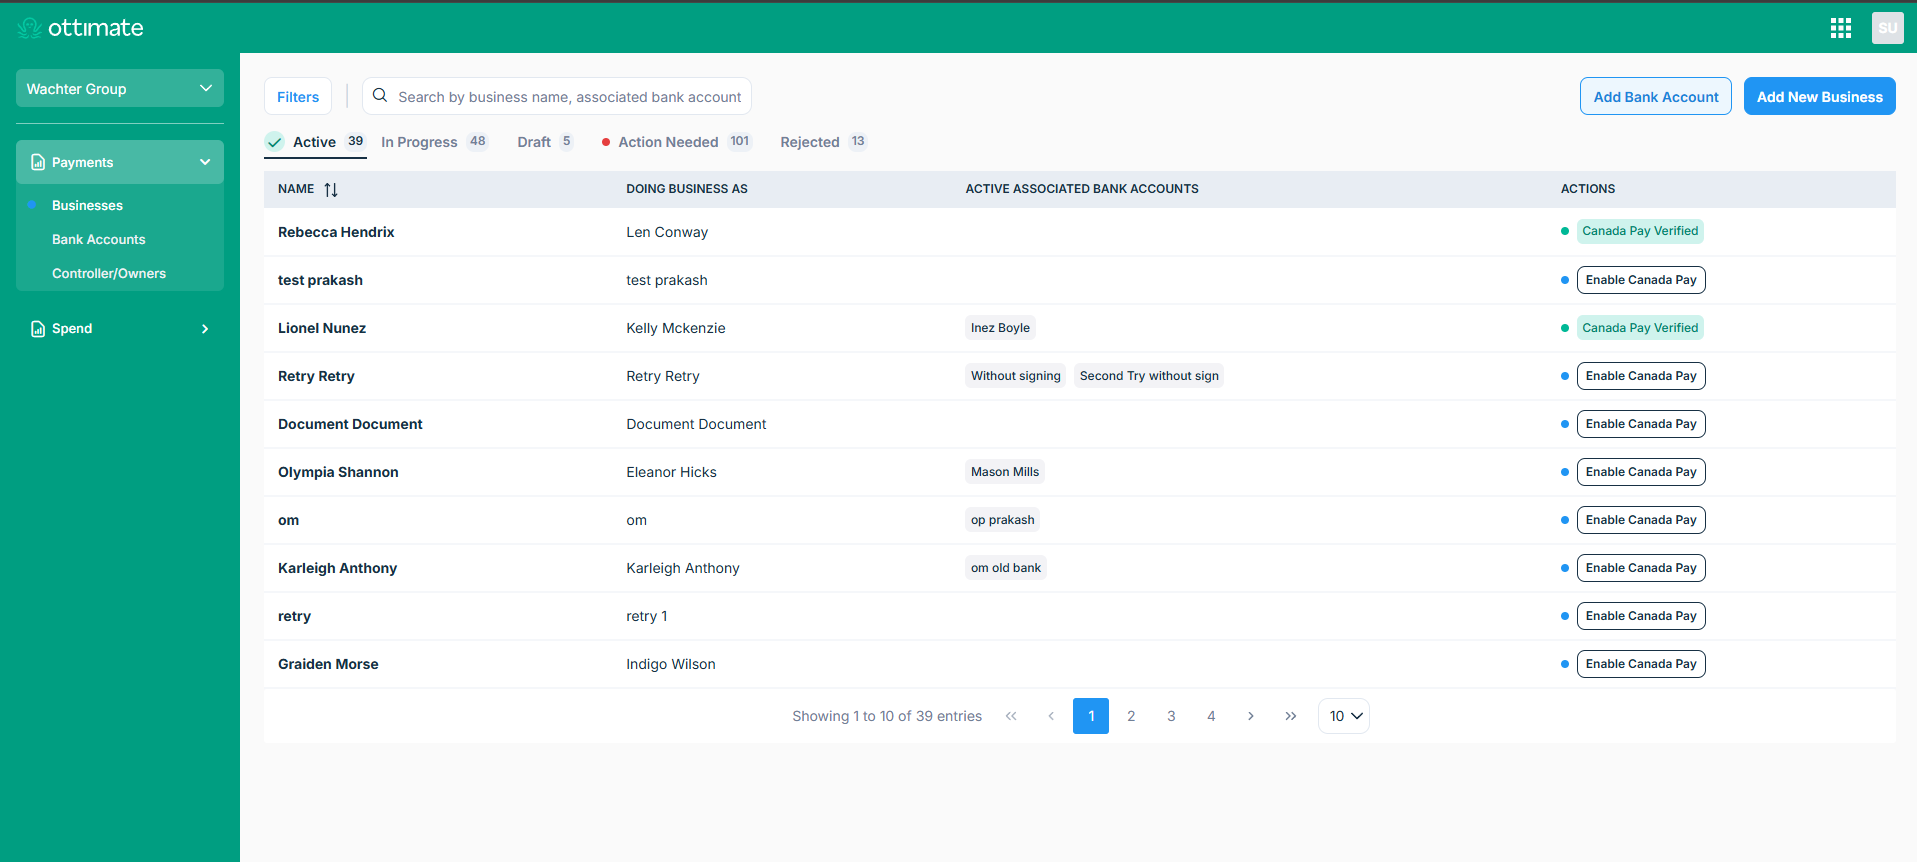
After a couple of minutes, once verification completes, the business will move to the "Active" tab.
Managing Stripe Verification Across Multiple Businesses
If your Ottimate account includes more than one legal business entity, you can track Stripe verification status for each one from Payments > Businesses under each tab.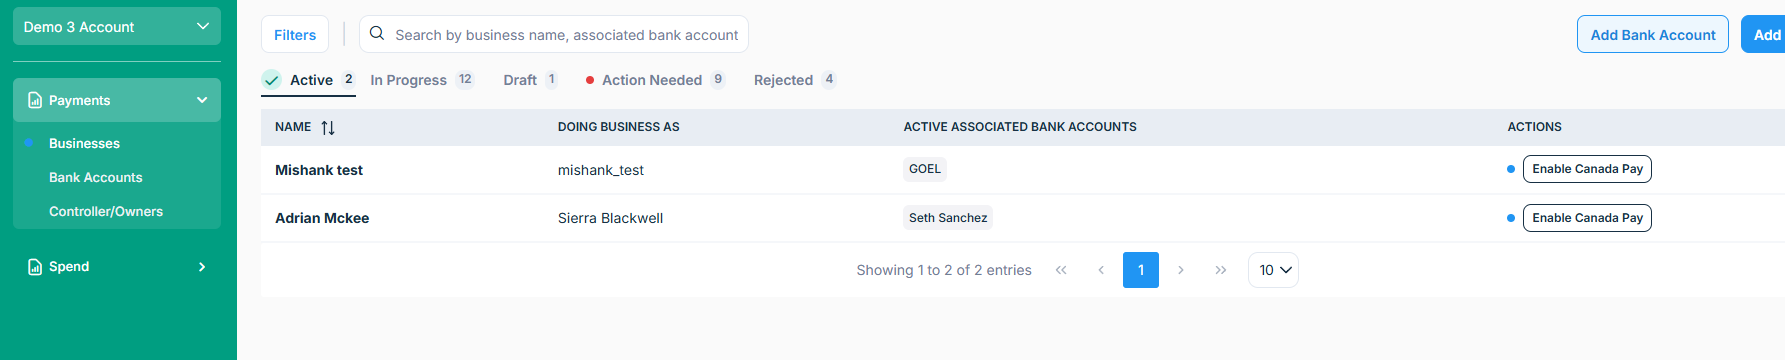
Bank Account Verification
Bank accounts can be added and verified independently of business verification. You don't need to wait for your business verification to complete before adding a bank account — but keep in mind, you still won't be able to make payments until both the business and the bank account are verified.
Step 1: Navigate to Bank Accounts
Under “Payments” in the left navigation, select “Bank Accounts,” then select “Add Bank Account.”
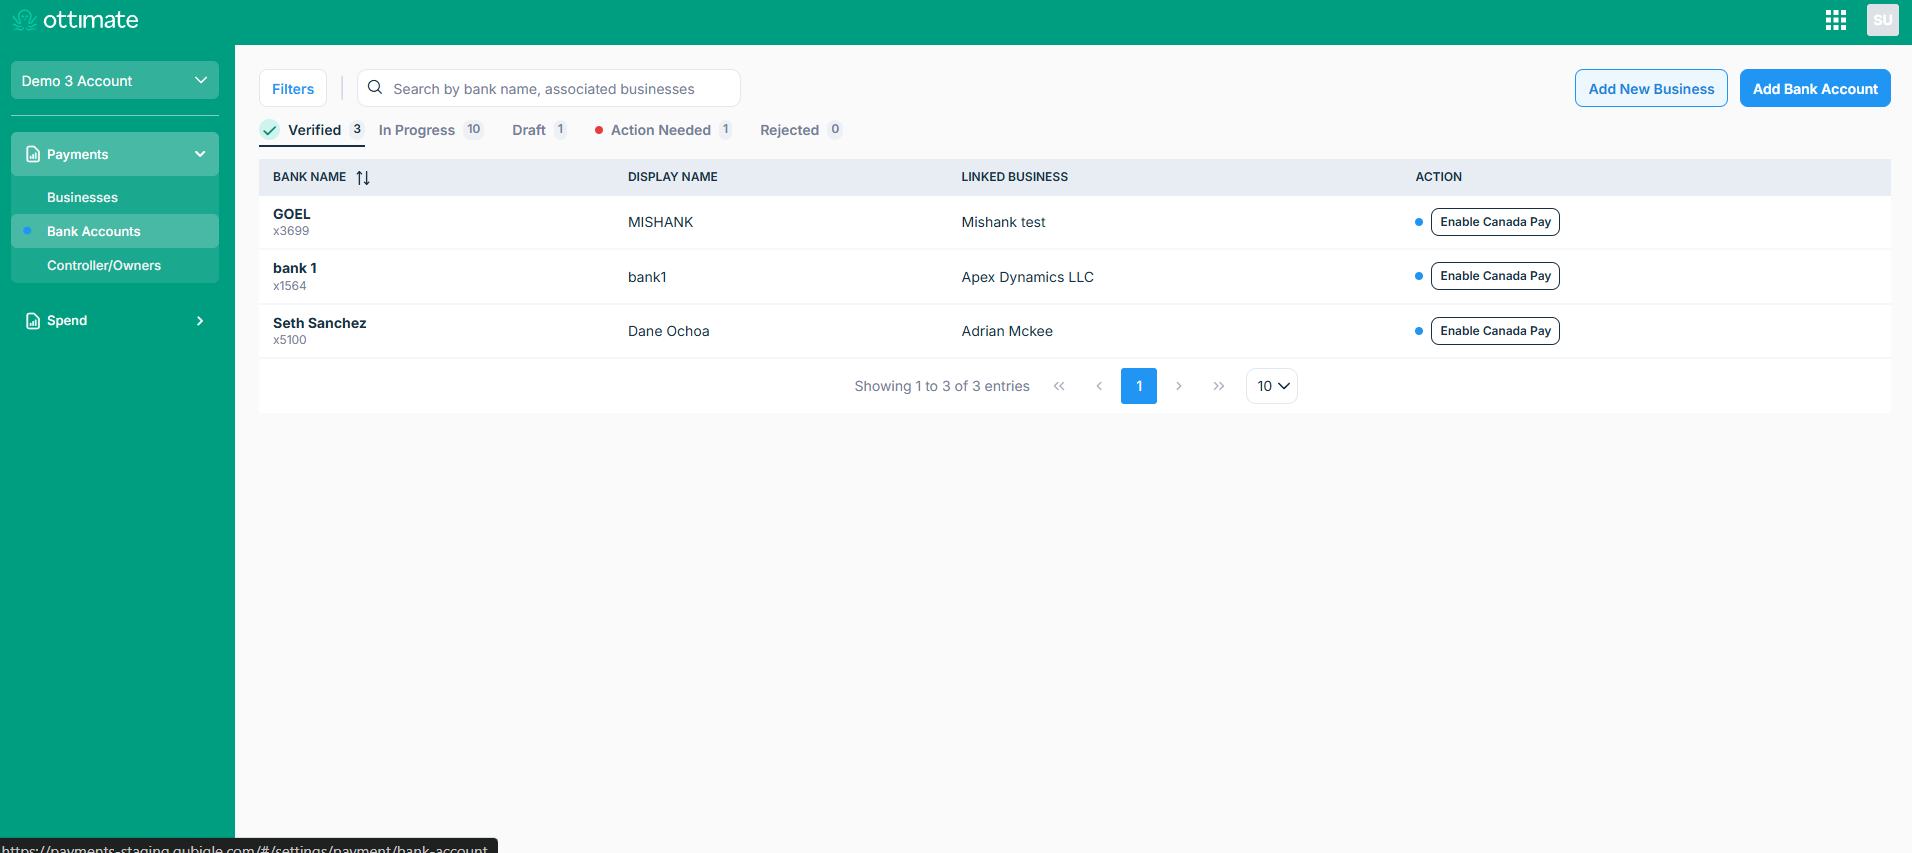
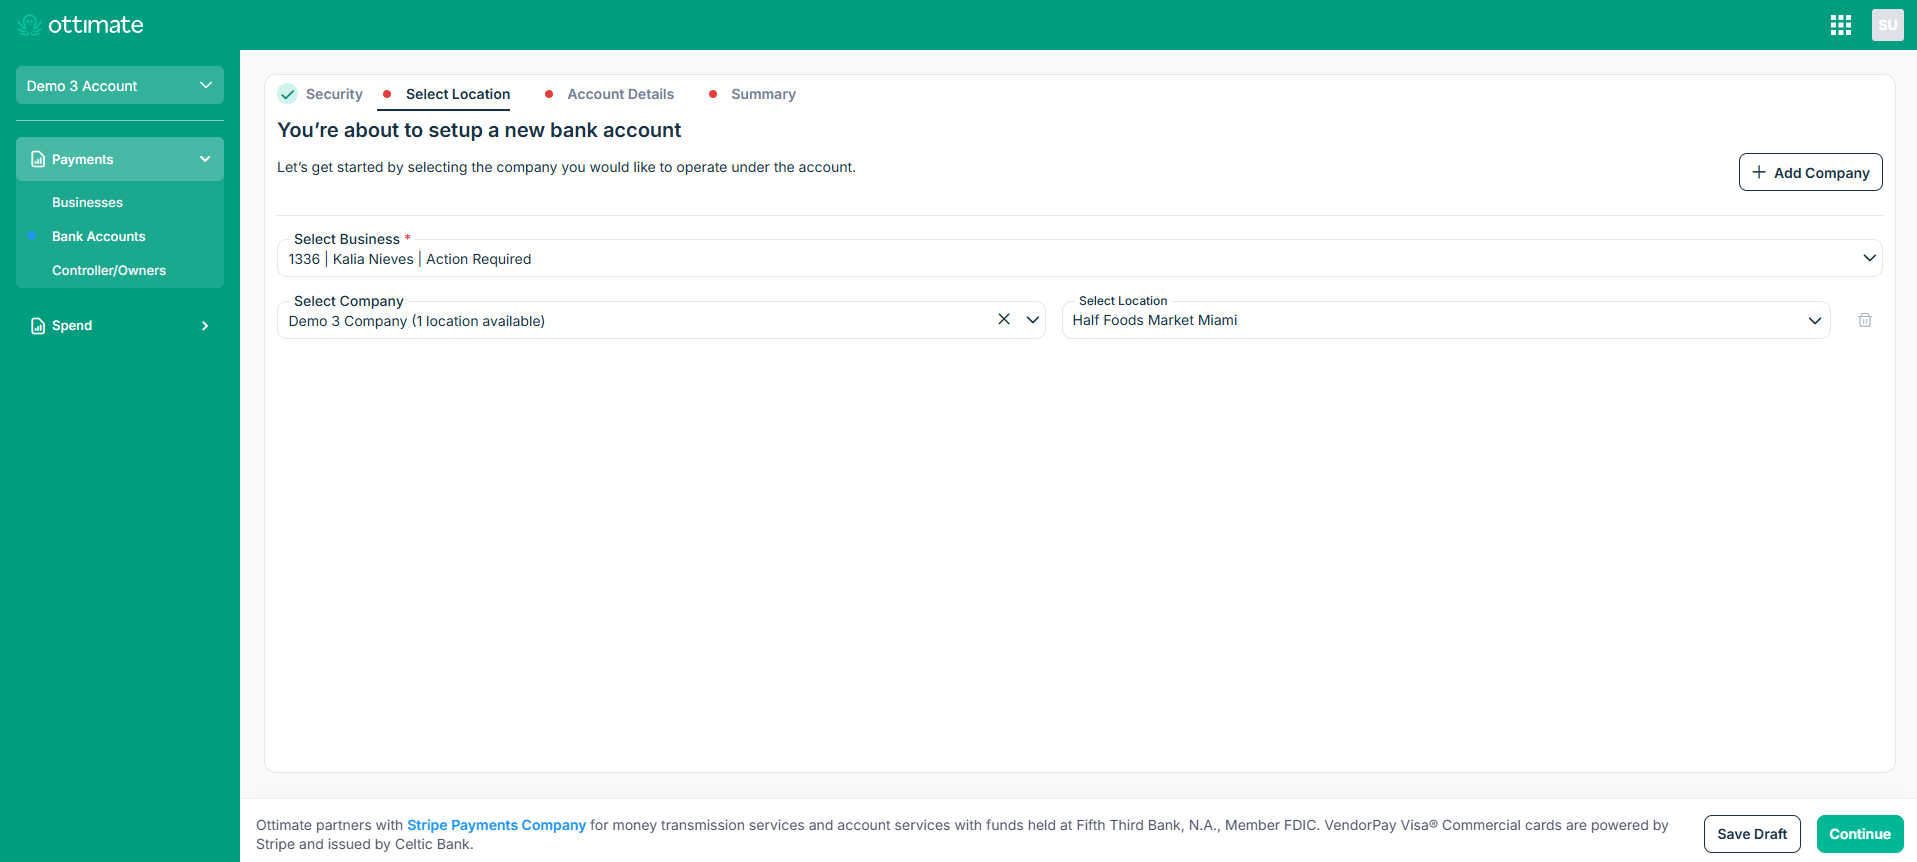
Step 2: Select Business, Company, and Location
Choose the business you'd like to set up the bank account under, then select the company and the location that will operate under this account.
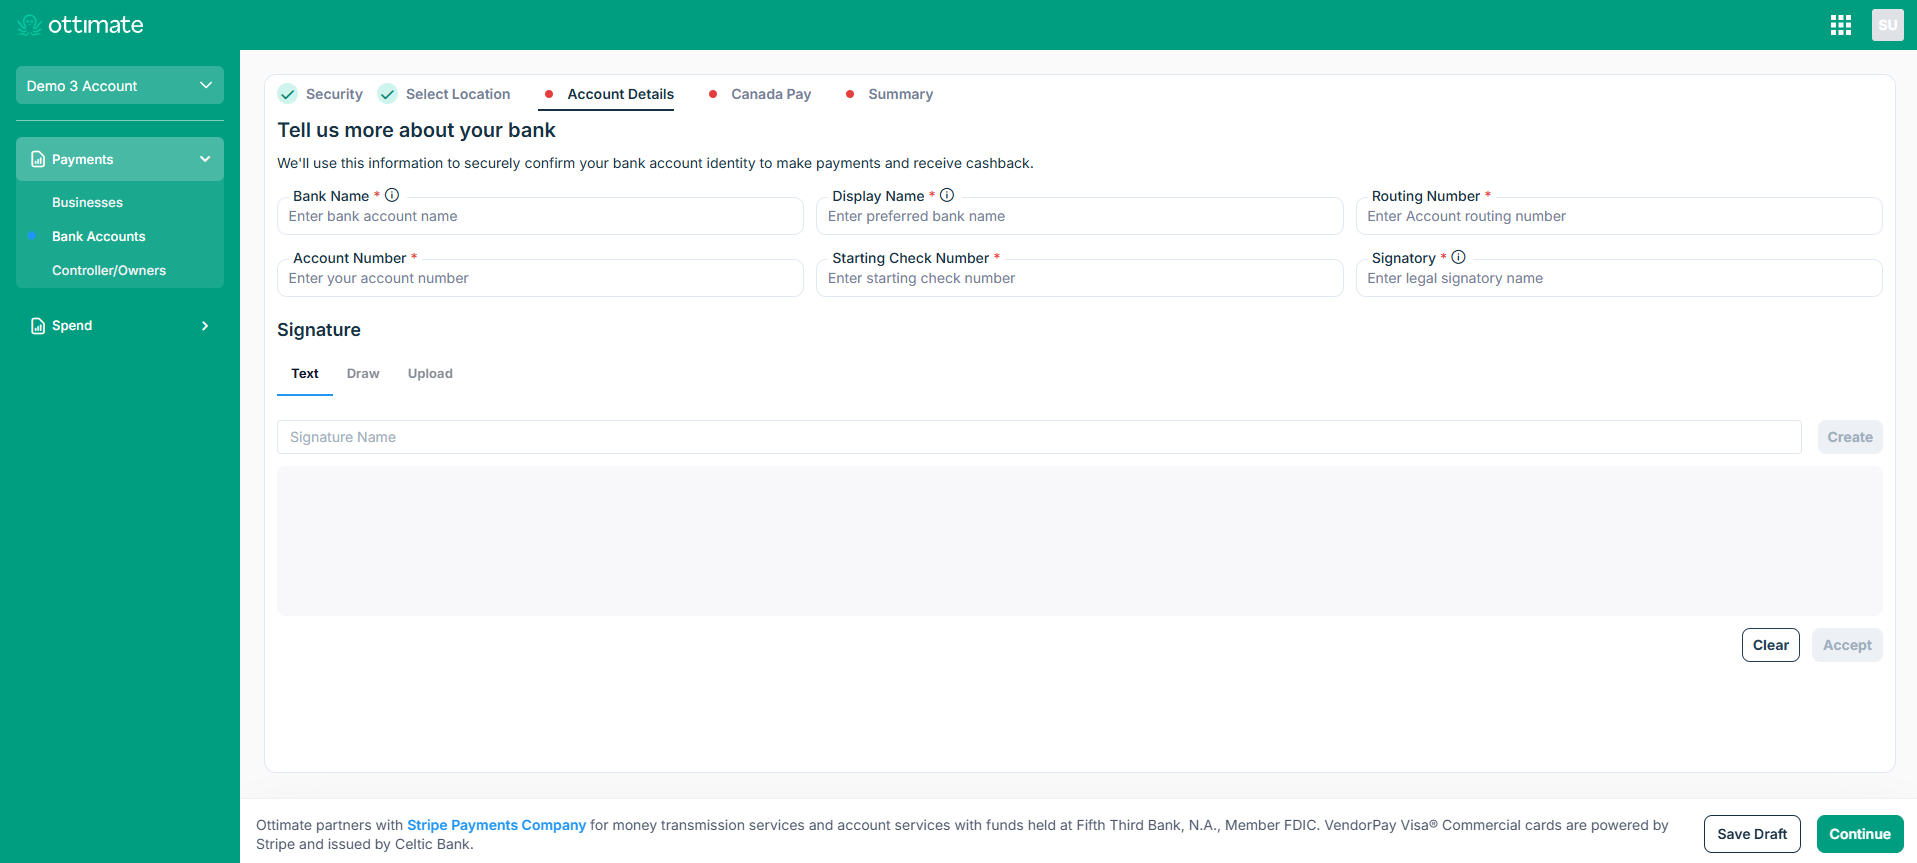
Step 3: Enter Account Details
Provide your bank details: Bank Name, Display Name, Routing Number, Account Number, Starting Check Number, and Signatory. Add a signature at the bottom — you can type, draw, or upload one — then select “Accept.”
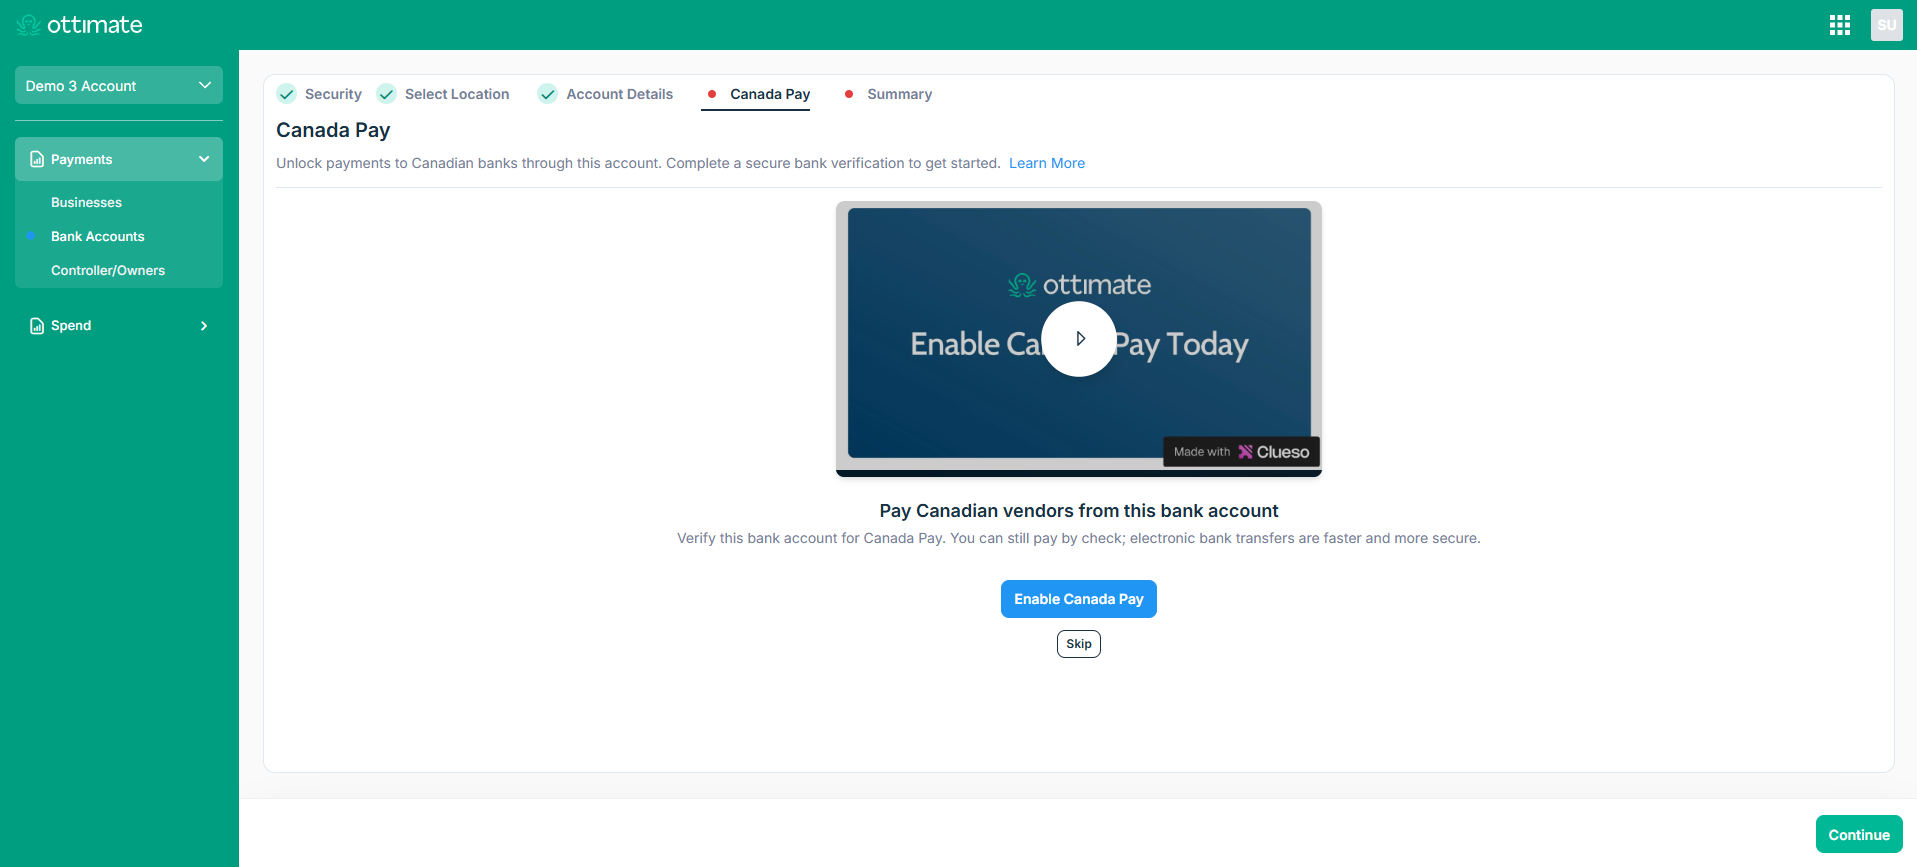
Step 4: Enable Canada Pay (Optional)
If you'd like to pay Canadian vendors from this account, select “Enable Canada Pay” and complete the verification. This step is optional — select “Skip” to continue without it. You can still pay Canadian vendors by check either way; enabling Canada Pay allows faster, more secure electronic bank transfers.
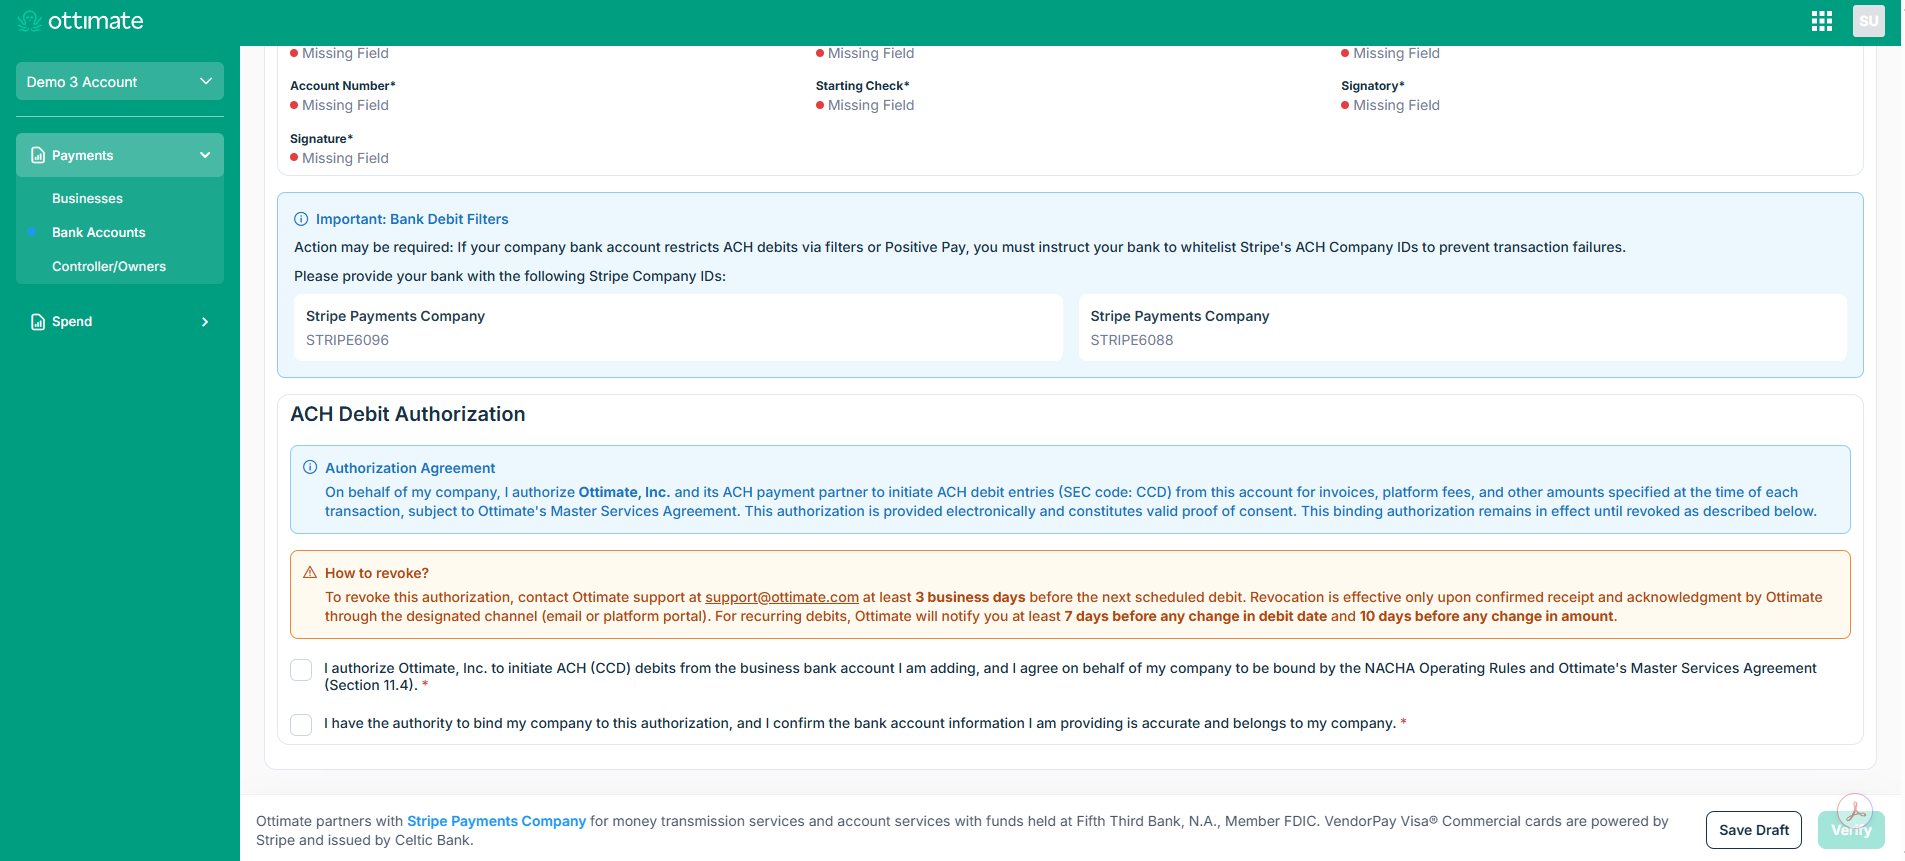
Step 5: Review Summary and Authorize ACH Debits
The Summary screen flags any missing fields and displays your Bank Debit Filters information. If your bank restricts ACH debits via filters or Positive Pay, note the listed Stripe Company IDs and share them with your bank so they can be whitelisted. Then review the ACH Debit Authorization agreement, check both boxes to confirm, and select “Verify” to submit.
Frequently Asked Questions
Why do you need my Social Security Number?
Federal KYC regulations require identity verification for a company's Controller and any Beneficial Owners. Your information is encrypted and used only for verification purposes.
What if no one owns 25% or more of my company?
Check the box on the Beneficial Owner step confirming there are no individuals owning more than 25%, and continue to the next step.
Can I save my progress and finish later?
Yes. Your progress is saved automatically as you go, so you can pick up right where you left off.
What happens if a check comes back as "Action Needed"?
Open the flagged section on your Business page for details on what to correct, update the information, and resubmit. Reach out to support if you're not sure what's needed.
Is my information secure?
Yes. Ottimate partners with Stripe Payments Company for money transmission and account services, with funds held at Fifth Third Bank, N.A. (Member FDIC). Your data is encrypted in transit and at rest.
Need Help?
If you have questions at any point in the setup process, reach out to our support team and we'll be glad to help.
Was this article helpful?
That’s Great!
Thank you for your feedback
Sorry! We couldn't be helpful
Thank you for your feedback
Feedback sent
We appreciate your effort and will try to fix the article