GL Mapping Rules let you teach Spend which GL account to use, so you don't have to pick the same account every time a familiar charge comes in. Set a rule once, and matching card transactions are coded for you.
Availability: GL Mapping Rules are turned on per account. If you don't see the mapping pop-up or the GL Rules page, the feature isn't enabled for your account yet. Contact Ottimate Support to find out more.
How GL Mapping Rules work
Each rule has two parts:
Condition: what to look for on a transaction.
Action: the GL account to apply when the condition matches.
Note: GL Mapping Rules apply to card transactions only. They are not applied to reimbursements. See "Reimbursements" later in this article.
Create a rule from a transaction
This is the quickest way to create a rule, because you do it while you're already coding the transaction.
Go to Transactions and click a transaction to open its details panel on the right.
Under Account Mapping, choose a GL Account.
A Create Transaction Mapping Rule pop-up opens, reading "Map to [your GL account] account." Choose one option:
Always for transactions from vendor [merchant name]: every future transaction from this merchant uses this GL account.
Always for transactions made on this card ([cardholder] x[last 4]): every transaction on this card uses this GL account.
Just for this transaction: codes this one transaction only. No rule is created.
Click OK.
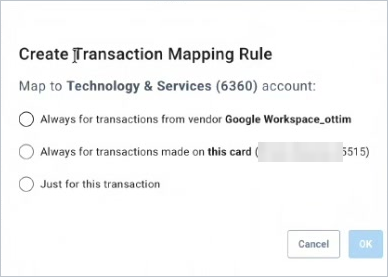
Figure 1. The Create Transaction Mapping Rule pop-up.
You can also click Set up GL account rule under the GL Account field to open the same pop-up.
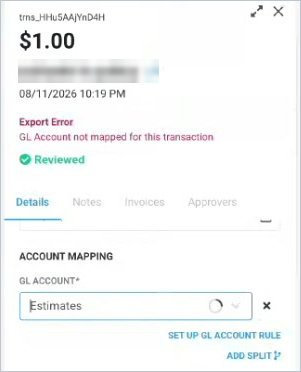
Figure 2. The transaction details panel, with the GL Account field and the Set up GL account rule link.
Anyone with access can create a rule this way, whether they're an admin or a regular user. Rules from regular users need an admin's approval first. See "Approval for rules created by users" below.
Note: For a pending transaction, the details panel shows "Vendor mapping available after transaction completes." The vendor-based rule becomes available once the transaction has posted.
Create a rule from the GL Rules page
Use this method to set up rules before the transactions arrive.
Open Settings and, under Mapping Rules, click GL Rules. You'll see every rule, with the Active and Pending Approval tabs and the Add Rule button.
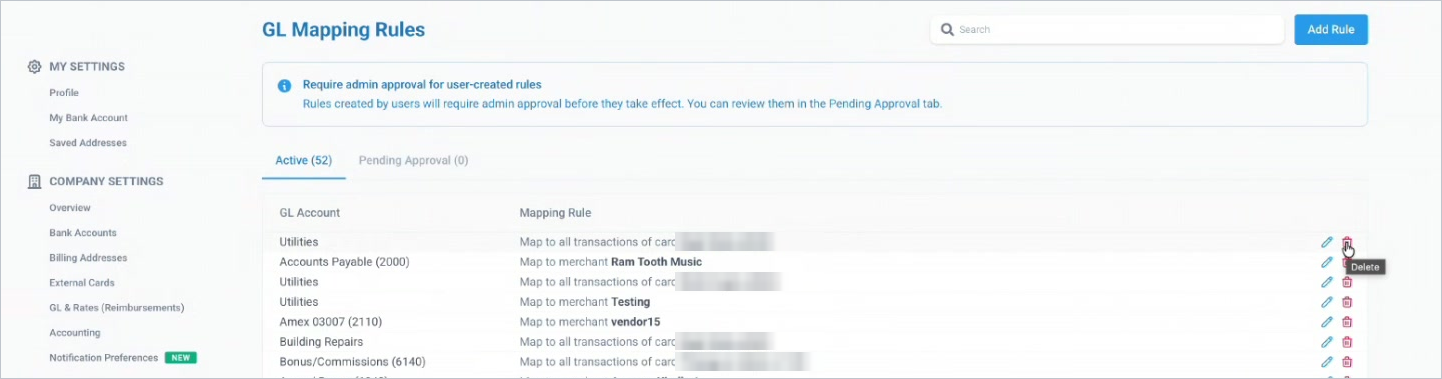
Figure 3. The GL Rules page: the Add Rule button, the Active and Pending Approval tabs, and the list of rules.
Click Add Rule.
Under Conditions, choose a condition from Select Condition (for example, Merchant). Then enter the Value. For a merchant, you can pick an existing merchant from the suggestions or type in a new one.
Under Actions, open the GL Account list, search for the account, and select it.
Click Save Rule.
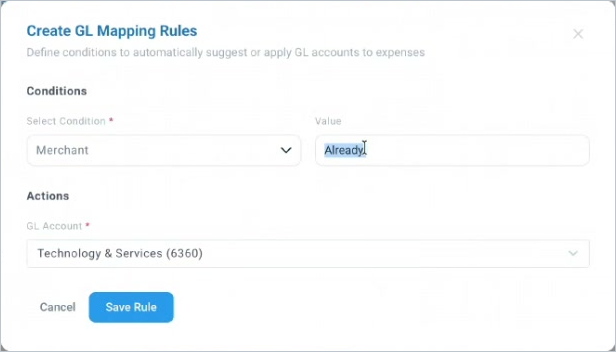
Figure 4. The Create GL Mapping Rules window, with a condition and a GL account chosen.
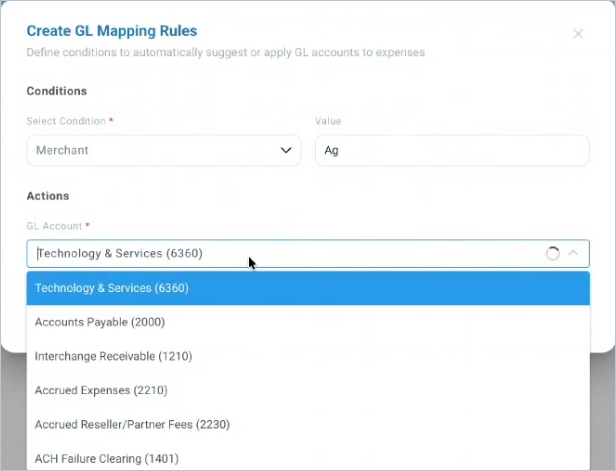
Figure 5. Choosing the GL account for the rule.
From then on, any transaction that matches the condition is assigned the GL account you chose.
Approval for rules created by users
Rules created by a regular user don't apply right away, whether they're created from the transaction pop-up or with Add Rule. They need an admin's approval first.
The GL Rules page has two tabs:
Active: rules that are live. The tab shows how many there are, for example Active (52).
Pending Approval: rules waiting for an admin. The tab shows Pending Approval (0) when nothing is waiting.
What happens next:
If an admin approves the rule, it moves to the Active tab and starts being applied.
If an admin rejects the rule, it's discarded and doesn't appear anywhere.
You'll see this notice at the top of the GL Rules page: Require admin approval for user-created rules. Rules created by users will require admin approval before they take effect. You can review them in the Pending Approval tab.
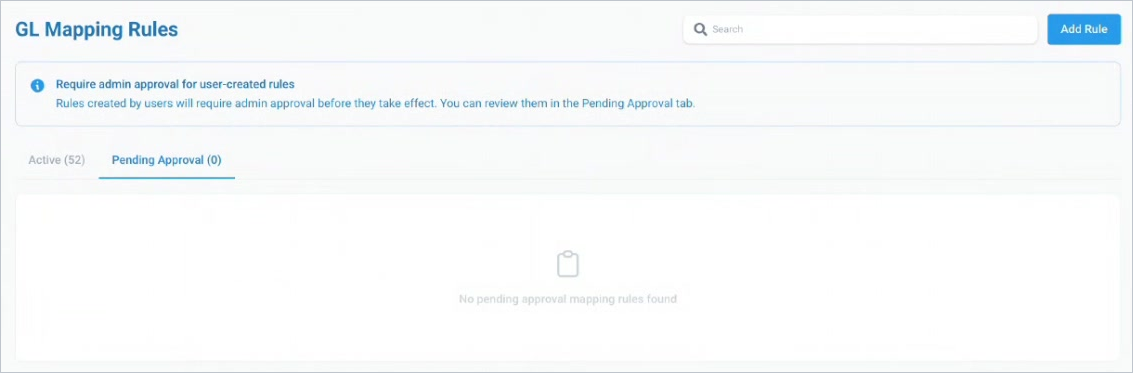
Figure 6. The Pending Approval tab when no rules are waiting.
Edit or delete a rule
Use the Search box at the top of the GL Rules page to find a rule. Then use the icons at the end of its row.
To edit a rule, click the pencil icon. The condition is locked, so you can only change the GL Account. If you need a different merchant or card, delete the rule and create a new one.
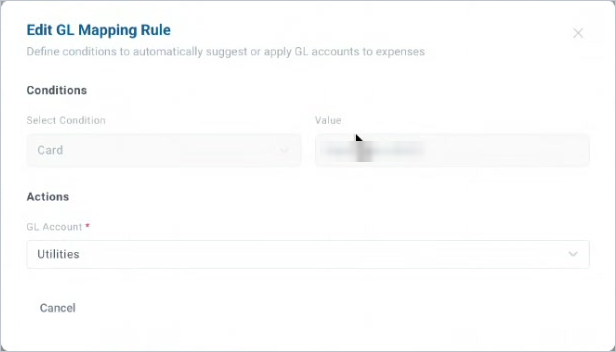
Figure 7. Editing a rule. The condition is locked, and only the GL Account can be changed.
To delete a rule, click the trash icon and confirm. You'll see a "GL Account mapping deleted" message afterwards.
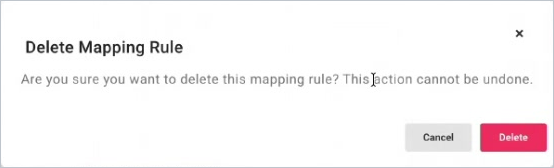
Figure 8. The delete confirmation.
Changing or deleting a rule affects future transactions. It doesn't change transactions that were already coded.
Reimbursements
GL Mapping Rules don't apply to reimbursements. When you submit a general expense under Reimbursements, the GL account isn't filled in for you. Choose it yourself in the Accounting Details section. It's a required field.

Figure 9. On a reimbursement, the GL Account is selected manually.
Troubleshooting
"Duplicate rule detected" when I save a rule
A rule with the same condition value already exists, for example another rule for the same merchant. You may also see a message saying "There was an error creating the mapping rule. Please try again." Edit the existing rule, or adjust the conditions in your new rule and save again.
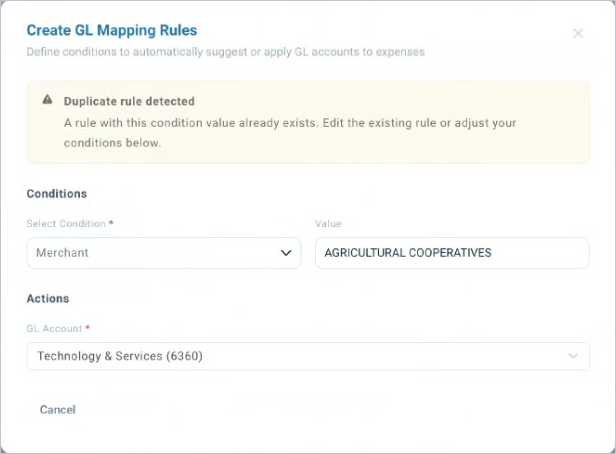
Figure 10. The duplicate rule warning.
A transaction shows "GL Account not mapped for this transaction"
The transaction has no GL account, so it can't be exported (see Figure 2). Open the transaction and choose a GL account. Create a rule if you want future transactions from that merchant or card coded automatically. The GL Pending filter in the Transactions sidebar lists transactions still waiting for a GL account.
My rule didn't apply to a new transaction
Check that the rule is on the Active tab and not still under Pending Approval.
Check that the rule's merchant or card matches the transaction.
Rules apply to new card transactions. They don't recode transactions that already have a GL account, and they don't apply to reimbursements.
I can't find the vendor option on a pending transaction
Vendor-based rules become available after the transaction completes. Use the card option or Just for this transaction in the meantime.
Was this article helpful?
That’s Great!
Thank you for your feedback
Sorry! We couldn't be helpful
Thank you for your feedback
Feedback sent
We appreciate your effort and will try to fix the article